It's kind of like quilting directions for a quilt. You know, you find that pattern that you love, buy the fabric, settle down, and make the quilt top. And at the end of the directions, there is always that one line that strikes fear in the heart of most quilters, "Quilt as desired."
Annnnddddd that's where I generally draw a blank.
Applique is similar. There are some gorgeous applique patterns out there, and they leave it up to you to determine which method is best for the quilt and which method is the best for you. And like quilting, there are several options and each option has a distinct look. Each option also has pros and cons. I want to address needle turn, freezer paper, Mylar template, and machine applique while we work on this quilt. For Ring Around the Rosy, I'm going to start with needle turn.
Those that know me realize that this is no accident. Needle turn is my favorite applique process. The pros for me with this process are that it's portable and I think easier than the other methods. I also like handwork, so that could be a pro or a con depending on how much you enjoy hand sewing. However, since it is done by hand, needle turn applique does take longer than machine applique. It also has a much softer look than any of the other types. It easily allows for gentle curves and shapes.
At Piece with Time has lots of small applique pieces and for me it's easier to control the smaller pieces by some method of hand applique. But again, that's me. I have friends who can work miracles with machine applique.
The first item on my to do list for Ring Around the Rosy was make a copy of the daisy applique pattern. Working with a flat copy is just easier than trying to fight the book.


The next thing I do is grab a piece of foundation piecing paper. This paper is very thin and can easily be seen through, especially when using a light box. I place the paper over the daisy...


Notice I have included the dashed lines that form the X. These are very important. They are placement lines and we will get back to those in a moment.
The next step for me is to flip my paper over on the light box, and go back over the image with a fine black Sharpie.

Could I have just flipped the copy of the daisy over and outlined it with the black Sharpie? Yes. And you can certainly do that. I just think the foundation paper is easier to see through and as a 52 year-old woman with bad eyesight, I give myself every advantage I can!
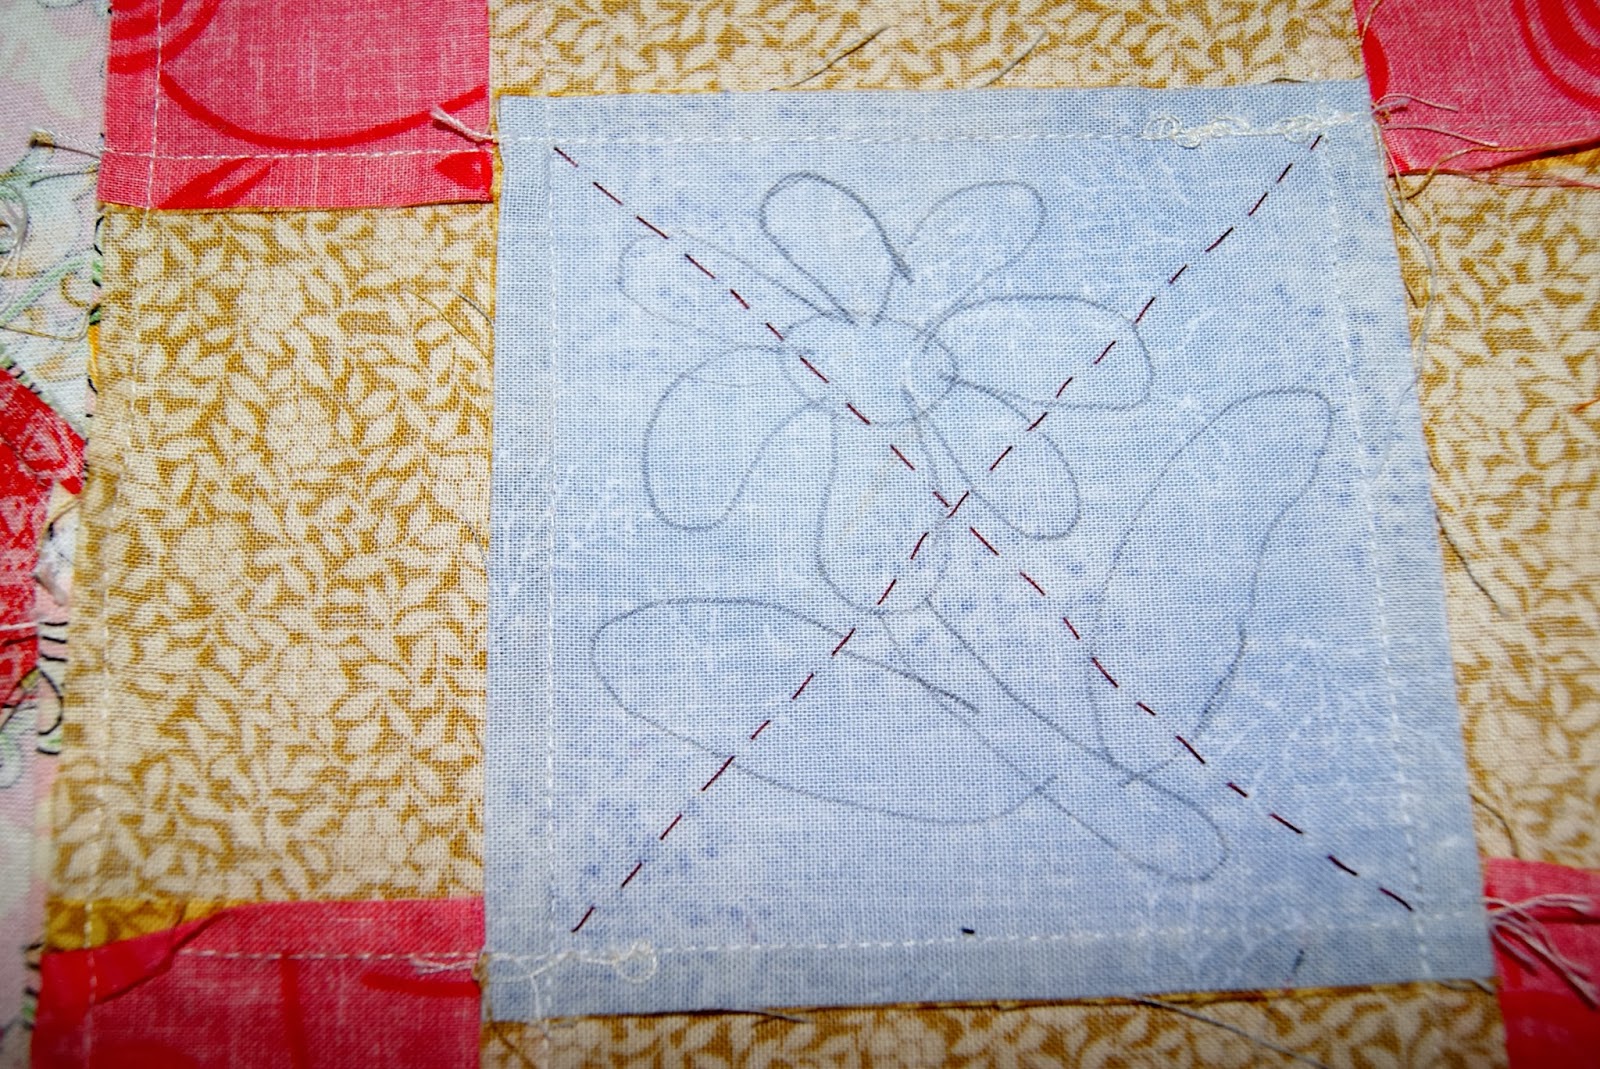
The next thing I did was baste a X on my middle square in the block. I can match the X on the pattern with this X and make sure the daisy is centered:

Remember your square is on point. The center square needs to be horizontal, not on its side. Place the pattern on the light box, flip your quilt square over to the wrong side, and center the center square on your pattern, matching the dashed X marks. Then trace the daisy to the wrong side of your quilt square. I use a #2 pencil for this.


This is how it looks from the right side of the block -- and you will be now working from this side to complete the stem.


Thread an applique needle with thread that matches your stem. Carefully remove the first stitch or two of the basting stitches.

Bring the threaded needle up from the back of your quilt square. Turn the stem fabric under and take a tiny stitch to sew the folded fabric in place. I only pick up a thread or two of my applique fabric. The applique stitches need to be nearly invisible.

There are two tools that can be really, really helpful here. One is a toothpick that is slightly moistened. It helps turn the applique fabric under easily.

Annnd to keep my toothpick moistened while appliqueing, I usually hold it in my mouth. Yep. True confession time here, and let me tell you it's attractive (not....)
The second tool that is helpful is some type of magnifying glass. This will let you see your work in an enlarged setting so that you can keep your applique stitches really small. There are types of magnifying glasses made primarily for quilters that are worn on a chain around your neck. However, I have found these cumbersome and expensive. The best ones I have found are the magnifying glasses with a head-mount that are worn by miniature enthusiasts -- the folks that work with dollhouses or miniature train settings. Some even come with lights.
If you're new to hand sewing, or simply haven't done it in a while, you may find this part slow-going. I promise the more you do it, the faster you will become at it.

Don't remove too many basting stitches at one time! Just one or two, then stitch down the stem, and remove a couple of more.

Notice how tiny the applique stitches are. They are even barely noticeable on the wrong side of the quilt block.

The second applique item to add is a daisy petal. Remember to add the pieces in numerical order so that all exposed raw edges are covered.


When all pieces are appliqued, the daisy will need to be pressed. Place a clean towel on an ironing board and lay the block wrong-side up on the towel. Press gently from the wrong side.
And the best pressing towel I have EVER had? A Shamwow. Awesome.
Couple confessions about my pressing any applique.
1. When I come to a spot when I have one applique piece that overlaps another applique piece (as when we added the first daisy petal), I press the applique before adding the overlapping piece. So I pressed the stem before I added the first petal. I think it makes the applique look better and not so "puffy."
2. And yes, I do use steam. However, I don't use starch at this point.
Now your block should look similar to this:

Sew much fun!
Love and Stitches,
Sherri
No comments:
Post a Comment