Hi Everyone....
I'm moving my blog off of Blog Spot and over to WordPress. There are lots of reasons for this ... more formatting options, I can offer down loadable patterns, I can set up a website through them, etc. I've enjoyed my time on Blog Spot, but it's time to grow and WordPress offers those options at a reasonable price.
Other than the format changing (you'll immediately notice a sleeker, prettier blog), nothing else will. Sam and I will be posting weekly. Quilts, quilting, and quilters will be featured.
Here's the link: https://sherriquiltsalot.com. Be sure to bookmark it. When a new blog is uploaded, it will automatically go out on my Facebook feed and my Twitter (@sfields61).
Sam and I thank Blog Spot for this time with them. I was planning to cross post until the end of the year, but that's jut a hassle I don't have time for.
Love and Stitches,
Sherri and Sam
Friday, August 26, 2016
Thursday, August 18, 2016
The Techno Quilter
It’s been an interesting week…
First of all, my left knee is in a brace. A big brace.
A heavy brace. An uncomfortable
and hot brace.

I’m not quite sure how I did it, but I’ve managed to
tear/pull/damage a ligament in my left knee.
This is the same knee that has given me issues since I fell on the ice
several years ago.
How did I manage to damage a ligament in my knee?
I have no idea.
Seriously. None.
All I know is I was walking through the produce section of my local
Harris Teeter and experienced a sharp, burning sensation in my left knee. After getting my groceries and hobbling out,
I was given a brace and anti-inflammatories and good pain meds.
Did I slip and fall?
No.
Did I “step funny?” No. And what does that mean anyway? Do I call the Ministry of Silly Walks?
Did I roll my ankle? No.
Only I could manage to be doing something normal and
injure myself.
So I’ve been limited this week on doing anything because
the only thing I really feel like doing is sitting with my knee propped up with
an ice bag on it. This is extremely
demotivating, but the pain is real and the brace is uncomfortable. I’ve managed to work on my Farmer’s Wife
Quilt and am starting a new class on Saturday.
I wish I could say that while I’m resting my knee I’m getting tons of handwork
done, but that’s not the case either. I’m
machine piecing so much that I don’t have anything prepped and ready to applique.
Oy-vey.
So I’ve said all that to say this: Optimize
technology. What does technology have to
do with my knee? Not a lot, but the knee
is the reason this blog is a little shorter than usual. As quilters, we have so much at our
fingertips. We can feed that instant
gratification monster within with a click of the mouse. There are downloadable patterns and Pinterest
and websites galore.
But there’s a whole other side to the techno-quilt
world, too. There are wonderful software
programs you should be taking advantage of.
The Electric Quilt is the top one on the list. And while it does have learning curve, it
also has tutorials available with the software.
The customer service is also good and the representatives are knowledgeable
and super-nice. It comes loaded with quilt blocks that can be printed out to
foundation piece or template pieced or rotary cut. You can design your quilt labels, your quilt
layout, and your quilt
borders.

In short, if you have enough patience and time, you may
never need to buy another quilt pattern. But no one has that much patience…just
ask my debit card.
Another software program you may want to purchase,
especially if you’re big into reproduction fabrics and quilts, is Barbara
Brackman’s Block Base.

If you’re old
enough, some of us you may have her book that has just about all the
historical blocks in there, broken out by type, and has all the names the
blocks have gone by. The software
program has all of this, and it’s a little easier to search through than the
book. The big bonus is that this
software interacts with the Electric Quilt program, so you can easily print out
any type of directions to make the blocks.
And both programs allow you to size and re-size the blocks quickly and
easily.
In addition to the Block Base, there is the Dear Jane
software (which can run independently of EQ) and the Farmer’s Wife Quilt
software (which cannot). Let me note
here that the FWQ CD that comes with the book is not EQ compatible. The FWQ
software that runs in the EQ 5, 6, or 7 programs is a separate CD.

And while we’re at it, let’s talk quilting apps for the iPhone. There is the Block Tool, which has a listing from
A-Z of the most popular blocks in various sizes and the amount of fabric needed
for each. The Foot Book is a handy thing
to have if you’re doing lots of different types of sewing that needs different
feet – it can tell you what kind you need instantly. Needle Travel is a great destination
planner. Type in the name of a city and
all the nearby quilt shops pop up along with a map. Superior Thread has a great app that’s free
so you can determine what kind of thread you need. Project Quilt is a great planner and allows
you to keep all your UFOs on your phone and at your fingertips. In addition, there are some quilting
calculator apps that are also really handy to have.
My favorite app is Quilt Sandwich which allows you to
create quilts on your phone, has a yardage calculator, and a stash inventory unless
your stash is like mine and you’d have to purchase extra memory to run this
portion of the app. I particularly
like this app because you can snap a picture of your stash and upload it into
your quilt diagram and compare it to what you’re thinking about
purchasing. It makes for much wiser
purchases and does save you money.
If you come away from this brief and pain medication
influenced blog with nothing else but curiosity about what’s out there as
far as software and apps, my job here is done.
Technology is a wonderful and sometimes confusing thing.
But embrace it and use it. Think
of it as another gadget in your quilting tool box.
Love and Stitches,
Sherri and Sam

Thursday, August 11, 2016
This is Mostly Our Fault
Made it back from the family beach trip in one piece…it
was nice, it was fun, and it was hot.
It’s nice to be back home with Sam (who now refuses to let me out of his
sight) and back in my quilt studio.
However, I am a little … emotionally wrought at the
moment. I stayed off social media for a
great deal of the time while at Ocean Isle, so when I checked my personal
Facebook page I was surprised (also read upset,
alarmed, angry) to find out that City Quilter in New York City is closing
in October.
Oh. My.

If 2016 goes down as anything in the quilting world,
it’s going to be the Year of the Major Changes.
Let me recap…
1. The National Quilt Association closed. This was the granddaddy on the quilting block
– the organization that begat AQS, the National Teacher Certification Program,
and the National Judges Certification Program.
2. Quilters Newsletter,
the granddaddy of quilt publications, will cease publication in October
(October is looking like a lonely, lonely month already).
3. The
International Machine Quilters Association, which has been around for 20 years,
is shuttering.
4. The
Applique Society came very, very close to disbanding and has only survived by
going completely electronic and changing membership due dates.
5. City
Quilter in New York City – a major shopping destination for quilters both in
person and on line – is closing.
6. Hancock
Fabrics closed all of their stores.
7. And
finally AQS announced this week that they will no longer publish books.
I’m a quilter as well as an owner of a non-quilting
related business. Seriously – demolition
and environmental services are about as far away from quilting as you can get,
unless you count the fact that my paycheck allows me to foster my obsession,
habit, hobby. I’ve read more than my
fair share of contracts and seen equally as many P&L statements. Let me let you in on a little secret: These shop owners, boards, and publishers? They may love quilting and quilters, but they’re a business. Even the nonprofit organizations such as NQA
and TAS have to keep the bills paid and the “doors” open for their
members. The bottom line is the bottom
line no matter what, and when that bottom line bleeds red for several fiscal
quarters, changes have to be made and sometimes those changes are painful.

Normally at this point, the optimist in me would like to
issue a Pollyannaish statement, such as “Embrace change” or “No pain, no gain,”
but I’m also a realist and at this point I’d like to place blame squarely where
the blame belongs:
You
and me.
Now before you stomp away in a huff, hear me out. Remember, I have a long history of quilting
and work part-time at a local quilt shop.
I’ve been on all sides of the sewing machine except quilt store
owner. Let’s begin to deconstruct what
is happening in our quilting world, step by step.
First let’s deal with our shopping habits. The average age of the average quilter is now
55 and this is one area I’m happy to be below average. The
average female quilter is now at a
point in her life where her kids are pretty much grown and flown the nest or
she is at least very close to this point.
The house is paid for or paid down to the point that she’s comfortable
in the balance due. For the most part,
college tuition is a thing of the past and she has more disposable income to
spend in her quilting. So it’s not that
the money isn’t there to pay dues to organizations such as NQA, AQS, or TAS,
it’s that either A: She doesn’t see the
benefit of these organizations or B: She doesn’t like the way they’re run.
Let’s take A first.
If you don’t see the benefit of these organizations, quite frankly, you
need glasses. NQA offered judging and
teaching certifications, grants, quilt shows, and a wonderful publication. If you didn’t see these as benefits, then
honestly, I’m really not quite sure what you’re looking for. The same goes for AQS, who also offers all
types of on-line deals for their members as well as iquilt. TAS offers a terrific bi-monthly newsletter
with patterns and interviews with quilt artists as well as a very active
Facebook page that you can only join in on if you’re a member. There’s also an annual meeting that is tons
of fun.
“Oh, I can get all that at my local guild,” you say.
Really? You can
network with quilters from all over the world at your local guild? Seriously?
I thought so.
Now let’s look at B – She doesn’t like the way these
organizations are operated. If the
quilting business is a privately held for profit business like AQS, then I’m
sorry. The president, etc., is going to
run the business in such a way as to produce a profit. So since we’re here, let’s look at the reason
why AQS is probably not going to
publish books any longer.

In short, print is dead.
And a large part of me hates that.
As a committed bookworm, I have always loved books and have a huge (by
my standards) library. However, for
Christmas several years ago, the husband gave me a Nook. At first I was actually offended. Somehow holding an electronic device and
reading from a screen did not hold the same appeal as a book with paper pages I
could actually turn.
Then I realized that I could store hundreds of books on this thing and not have to take a separate bag
for my reading material when I was on the road.
It would fit snugly in my purse.
I went from offended to deliriously happy in the span of minutes. Now I
have the Nook, a Kindle, and an Ipad.
All of them have not only the Kindle app on them (as well as my cell
phone), but they also all have the Audible app, too, so I can listen to books
as I drive or while I’m working in my quilt studio.
I realize that quilting books are a little different
because lots of them contain templates or applique patterns to be used for the
quilt. With many of the quilting
e-books, these are usually held in a separate file that you print from your
home computer. This does entail making
sure that you’re printing the correct size, but it can be done. And guess what? You
are the one that carries the cost of the printing, not the publishing company. E-books can be produced at a fraction of the
cost of traditional publishing; and they’re available instantly on download (no
postage for you or the publishing company and instant gratification).
The downside to this is the authors we know and love
make even less of a profit with e-books than traditional books. And many of these e-books have to be self-published. No doubt this will mean fewer books on the
market for us quilters. But while we’re
here, let’s consider this: How many of
us are actually buying any kind of books if we can find it on YouTube as a
video or a free article found on a Google search?
Ah. Told you
so. See?
We are to blame for a lot of this.
Staying with AQS here, if you are a member and you
aren’t happy, let them know. They want
to make a profit and that profit depends on you,
the consumer—their member. Let them know
what you don’t like. If they want to
stay in business and enough people complain and threaten to take their dollars
elsewhere, they will work to may you a contented member again. Be nice, but let them know. They won’t realize you’re unhappy if you
don’t speak up.
If the quilting business is a nonprofit organization,
such as TAS, and you don’t like the way things are organized or run, let them
know, too. But please be aware that
organizations like the NQA, TAS, and IMQA (and your local quilt guild) are
operated by volunteers. Volunteers
who give up their stitching time to
help create wonderful associations you can join and receive education and
patterns and other free stuff. If you don’t like the way these are run then
volunteer your time to make them better. And this includes your local guild. If you’re not willing to work to make the
organization better, then you have no room to complain.
Still with me?
Good.
Now let’s talk fabric and thread and notions.


Like I stated earlier, I work part-time in my
local quilt shop, Dragonfly. This shop
is much more to my little group of quilting friends than simply the LQS. It’s a place where we gather on Tuesday night
to sit and sew and share burdens and joys.
It’s a place where I learn new techniques. It’s a place where I learn to be a better
quilter because these ladies I quilt with?
They are good. Really good. It makes me strive to always do my best. I want this shop to stay open forever and if
the owners ever decide to sell, I hope they offer it to me first. I want to continue this quilting karma.

However, since I work there, I also pay close attention
to the shopping habits of my customers.
You know what really, really makes me mad? Walmart shopping mentality.

Let me explain. I
spend hours helping customers sometimes.
I will help them dissect a pattern and graph it out. I will lug down bolts and bolts of fabric for
them and help them with a color palate.
They will like it and ask if they can take a picture of the material to
reference. Being the willing person that
I am, I tell them yes. Then I ask them
how much can I cut for them.
Only to have them tell me, they’re taking their cell
phone picture and going to Walmart (who has no salesperson that is going to do
for them what I just did), and finding the fabric.
Hell. Hath. No. Fury. Like. I. Feel. At. That. Moment.
Not only did I not make the sale, but now I have to put
all that fabric up for nothing.
Not to mention the times that I catch customers trying
to sneak and take pictures of patterns so they can make the quilt at home
without paying for the pattern. Or the
times a customer will tell me they can get the fabric/pattern/notion/book
on-line at a better price than we have at the store.
Let me insert here that yes, I do my fair share of
on-line shopping. Many local quilt
stores also have the on-line sales, too.
Yes, please use those. But if
you’re exclusively purchasing these items from large dealers such as Amazon,
Fabric.com, Thousands of Bolts, etc., then
frankly be prepared to kiss your local quilt store goodbye. We can’t compete. We have to make a profit in order to keep the
lights on and the doors open.
And while we’re at this point, let’s talk about what
this does to the pattern designer or book author if you incorrectly “share”
their work. If you correctly share their
work – that is loan the actual pattern, book, etc., to another person, then that’s
fine. However if you scan and send it
via email or make copies to give out (unless expressly given permission to do
so), you’ve shortchanged this designer/author out of their paycheck. These folks work on royalties and advances. Advances are paid by publishing companies
(either electronic or traditional) to the designers or authors to allow them to
concentrate on their work and not have to worry about paying their bills. Royalties are the percentage of sales of their pattern/book. So while making or scanning copies for your
friends is a nice thing to do for them, you’re hurting someone else. And if
the hurt hits the designers’ and authors’ pockets deeply enough, then even
their love of quilting isn’t enough to keep them producing what we love.
Think about that.
And while I may have ruffled your feathers at this
point, let me fluff them a little more by asking you to cut into your own
stitching time and teach a child to sew.

Let’s do some math at this point.
If the average age of the average female quilter is 55, and the average
age most women begin to quilt now is 32, then what is happening between the
ages of four (the age you can begin to teach a child to sew) and 31 as far as
quilting goes?
Not a whole lot.
Home Economics/Family Life or whatever the current
trendy term is for sewing and cooking class is no longer a required course for
any of our children – male or female. In
fact, most schools no longer offer it because they need the classroom space for
other core subjects. Insurance carriers
have a hard time understanding why they should insure schools that put kids in
front of hot stoves or machines with needles.
And God forbid our children have access to sharp scissors, much less
rotary cutters. So we are facing a
current generation that has grown up and the one that is now growing up without
the most basic sewing skills of even sewing on a button.
If you’ve done the math, then that’s 28 years that is
void of all most any type of sewing instruction. That’s 28 years’ worth of dollars that could
be spent supporting the quilting industry.
That’s 28 years that could be spent passing down our beloved art to the
next generation.
So we need to do ourselves a favor and teach children to
sew. They can learn as young as age four
and I know some 8 year-olds that are perfectly capable of making a quilt. I fear we’re going to shoot ourselves in the
foot as far as the quilting art goes if we seriously don’t consider the
implications of not reaching out to
children and young adults and introducing them to this art. It may not yield immediate results, but the
seed of curiosity has been planted. Who
knows what it could lead to?
So where does the blame for all of these changes
belong? Yes, some of it is mismanagement
(such as Hancock’s). Some of the change
is simply the result of advancing technology that not only lowers cost, but also
alters the way we’re used to doing things (think of when the rotary cutter took
over templates and scissors). But a
large part of the blame should rest on you
and me and our shopping and quilting habits. I’ve said it hundreds of times before and it
needs to be said again: Support your local quilt shop.
Let me add to this:
Support
your local quilt guild.
Support
national and international quilt organizations.
Support
those mom and pop quilt shops with web pages by shopping them after your local
quilt shop.
Support
our quilt authors and designers.
Teach
a child/teen/young adult to sew.
There. I know I
may have upset some of you, but this needed to be said.
Love and Stitches,
Thursday, July 28, 2016
Quilting with Your Checkbook
Let’s talk about that last line of directions on just
about any quilting pattern: Quilt as
desired…
To me this is the most ambiguous statement out there in
the quilting world, because I have no idea what
I desire most of the time as far as the quilting process goes. There are those rare, few times, when I just know what I want the finished process to
look like. However, most of the time I
spend hours on line thank God for Pinterest looking at different quilting
motifs before I make up my mind.
There are the times – the quilt is larger than a twin or
a quilt is show-bound – when the quilt is destined for the long arm
artist. And that’s what I want to talk
about today – how to get your quilt top ready for the long-arm quilter.
The long arm quilting machine is a sewing machine with a
frame that ranges from 10 to 14 feet in length with an industrial machine head
with a larger harp than any domestic sewing machine. A complete long arming system typically consists
of the machine head, frame, a table with a layer of plastic under which can be
placed a pantograph and several rollers on which the fabric layers and batting
are attached (Wikipedia). Long arms are not new to quilting world –they’ve been
around since the mid-1800’s when they were turned by a crank. Over the past
10-15 years, they’ve found a place in quilt shops and homes. Cost continues to fall on these wonderful
machines, and I am sure that in the future, more of us will have one mine is
coming this Christmas.

The first thing a quilter needs to do when considering
long arming for her quilt, is talk to other quilters about who they would
recommend as a long arm artist. Long arm
artists advertise in a lot of different venues, but I wouldn’t let one load up
my quilt until I have had several of my friends recommend one. Believe me, if a long armer isn’t worth his
or her salt, quilters will let you know.
Once you’ve settled on one, call them and set up an
appointment to talk about your quilt and what you want. If the long arm artist has a waiting list,
that’s a good sign. That means he or she is talented at what they
do. The long arm quilter will ask you
lots of questions: Do you want
edge-to-edge quilting (an all over quilting design done either free hand or
with a pantograph or by computer) or do you want custom quilting (work done
with rulers and free hand that makes each block a little different)? What color of thread do you want on the front
and back? When do you want it completed? If you want edge-to-edge quilting, they will
ask what kind of design did you have in mind and if you want custom quilting be
prepared to spend more time working with your quilter.
It’s a wonderful idea to come to this meeting with some
definite designs in mind. If you’re a
little fuzzy about what you want as far as an edge-to-edge, look at the pattern
and see what the designer used, or do like I do and spend some time browsing
the internet. If you want custom, arrive
with sketches so that the long arm quilter has a starting point. But always listen to your long arm artist.
They’ve got lots of experience and have done lots of quilts. They may have a computerized design that fits
perfectly or a pantograph that works better than what you have in mind. If you do decide to have custom quilting
done, be prepared to pay more per square inch than you will for an all-over
design.
The long arm artist will also ask you what kind of
batting you want. If the quilt is not a
show quilt, I normally defer to the preference of the long armer. But if it’s a show quilt with applique, I use
two layers – a cotton batt next to the backing and a wool batt next to the
top. The wool batting gives the applique
a little extra “umph” and makes it look almost trapuntoed.
It’s a good idea to keep in mind that a really good long
arm artist is going to have several quilts ahead of yours. Keep this in mind if you’re working on quilts
for Christmas, birthdays, graduations, etc.
You will want to make sure you give the long armer enough time to quilt
your quilt.
Before you take your quilt to your long arm artist,
there are several items that you’re
responsible for:
1. Make sure your quilt is squared up. We talked about this in an earlier blog but
it’s really important. Measure your quilt
top (before borders are added) in three different places along the width and
length. The measurements should come out
pretty close – exact is even better.
Take the average of these lengths and widths, and cut the borders. Apply the borders evenly. Fullness or puckers in the border can’t be
quilted out. The flatter your quilt top lays, the better your finished quilt will
look.
2. If
the border is pieced, stitch 1/8-inch away from the edge. This will help keep the pieces together and
will be covered by the binding.
3. Make
sure all seams are secure and threads are clipped. Dangling threads can show through the lighter
fabrics.
4. Press
seam allowances in such a manner as to reduce bulk. We covered this in last week’s blog.
5. Put
a safety pin at the top of your quilt.
Remember, your long arm artist is not a mind reader. What you consider the top and what she
considers the top may be two different things.
The safety pin lets her know which end is up!
6. Don’t
worry about basting your quilt or layering it.
They are loaded up on the long arm as separate layers.
7. Press
the top well and fold it accordion-style over a padded hanger to keep the
wrinkles at bay.
As you’re reading this I
hope you can relate to what we talked about in last week’s blog. A great deal of the prep for the quilting
(clipping threads, reducing bulk in seams) can be done as you make the top.
The back of the quilt will
also need some preparation before you take it to your quilter. If you’re like me and buy the fabric
specifically made for backing (extra wide so you don’t have to piece the back),
press it, accordion fold it, and hang it over another hanger.
If you piece your back, be sure to:
1. Cut off any selvage edges before stitching the
seams and use at least a ½-inch seam allowance.
Leave the selvage edges on the outside edges of the backing.
2. Trim
the top and bottom edges of the backing so that the backing is also squared
up. This will ensure that the quilt loads
into the machine straight, and that is important for keeping the design square
on your top.
3. Press
the backing.
4. Mark
the top of the backing with a safety pin, just like you did the quilt top.
With a pieced backing or a non-pieced backing, be
sure that the back is at least 4-6 inches wider on each side and top and
bottom than the quilt top.
These are extra steps, but they are so important if you’re
to have a positive experience with the long arm artist and they have a positive experience with you. Just remember what I said earlier: Long arm artists are not mind readers. You have to be sure to communicate clearly
with each other. Ask questions. Expect reasonable and good service, but not
miracles. If your quilt top isn’t all it
needs to be, all the quilting in the world isn’t going to make it perfect.
There will not be a blog next week, as I am leaving with
my family on Saturday for our annual Entire Fields Family Vacation also
known as Can Seven Adults and Two Kids Under Five Live in One House for a Week. Seriously.
This should be a reality show….
Love and Stitches…
Sherri and Sam
(PS Sam will not be going to the beach with us. He, as a rule, hates to travel, even though he has a really blinged and bedazzled cat carrier with all the creature comforts he could ever think of. Instead, he will have the house to himself and my niece is coming by to pet him and feed him. I've hidden the catnip, so he should behave himself).

Friday, July 22, 2016
Almost There....

I blogged some months ago about finishing projects and
how to get all your ducks in a row to finish successfully and in a reasonable
amount of time. These “ducks”, as you
know, are funny creatures. I’m lucky to get all my “ducks” in the same pond,
much less in a nice, neat row.

As you’re busy sewing and piecing, it’s important to
keep the final steps in mind, even though those steps may seem an eternity away. At some point, you or someone else is going
to have to quilt your top. So with
finishing in our focus, pay attention to the seams. How you press those seams is just as
important as keeping a consistent ¼-inch seam allowance. Typically, we press towards the darker
material so the fabric won’t “shadow” (show through on the front side of the
lighter fabric).

This is a good rule of
thumb, but as with many rules, sometimes you have to break them to make
progress.
If there are several seams coming together at one point,
it may be a good idea to press the seam open.
We do that to reduce bulk. If
there are several seams converging at one point, it can be difficult to get a
needle through all of those, plus the backing and batting during the quilting
process – even with one of the long arms.
Pressing the seams open will help. You have to keep the quilting in mind during
the piecing so that everything will flow smoothly as you head towards that
finish line.

It’s equally important to square up your quilt as you
go. The best quilt patterns will give you an unfinished size of each
section and each block as you go.
Remember unfinished is the adjective
used for a block or a blocks section before
it is set in a quilt. I love quilt
patterns that give you those sizes for each section as you go. It’s so easy to adjust your seam allowance
and make changes before you’ve made a half a dozen blocks and realize the size
is not right. That makes me want to cry
and toss the quilt in a closet and just forget I ever started. However if the pattern doesn’t give you the
unfinished size of each section, it should give you the unfinished size of the
block. It’s a good idea to complete one
block of each of the types of blocks used in the pattern and make sure the
sizes are coming out consistent with the pattern. It is always, always, always easier to make
changes in the beginning than get almost through with the top and realize that
blocks are not going to match up. So
finish a sample block, measure it, and square it up if necessary, before making
all the blocks.

Squaring up the blocks simply means trimming the block
down to the unfinished size required by the pattern. Often times, you’ll only need to even up the
sides before sewing on the sashing or sewing the blocks to one another.

But this step is important because it means
all of your rows should come out the same size, which means all of the sashing
will go on without a struggle and then the rows will go together perfectly.

Another thing you may want to do as you start cutting out
your quilt is go ahead and make the binding and the label – or at least design
the label so all you have to do is drop in the finished date when the top is
complete.

So often we get down to the
last few steps and realize we have to cut more fabric. It’s really easy to go ahead and cut the
binding while we’re in the cutting zone at the beginning and it’s just as easy
to stitch it together and iron it while we’re piecing. There’s something about having to go back to
that cutting table to make the binding that just kind of takes the wind out of
progress and makes it easy to set it aside.
But if it’s already cut and sewn and ironed and just lying there waiting
to be stitched down that makes you (or at least me) get excited about that last
little push down the road to finishing.

Which brings us to batting and backing. I am kind of wishy-washy about these
two. If I find the backing for my quilt
that I absolutely have to have when I’m purchasing the rest of the fabric, I
will go ahead and buy it. However, I am
absolutely in love with the wide backing fabrics. They do not have to be pieced. Now, if I find regular-width material that
just meshes perfectly with the top, I will purchase enough of that to piece the
back. But as a whole, I will hold off buying
the backing until I can find the wider-width fabrics. That said, it may take me several days to
nail down the backing after my top is complete.
Yes, that hinders my progress.
But to me, not having a seam in the back of my fabric is worth it for
two reasons. First, I hate piecing
backings. And second, a whole back is
easier to quilt through if I’m quilting on my mid-arm or domestic machine.
Likewise, different battings give different effects on
the quilt and I may not decide on a quilting design until after I complete my
top. The effect and design plays into
what kind of batting I purchase and if I have one or two layers of
batting. So, again, with this step I may
wait until the top is complete and let it speak to me. If I am using a long-arm artist to quilt my
quilt, I will also talk with him or her before I purchase the batting.
Quilting, just like lots of things in life, is all about
reminding ourselves of the completed project while we’re in the middle of
making it happen. And it’s easy to
forget that as we’re caught up in making fabric choices and dealing with tricky
patterns. The more you piece and quilt, the easier it is to keep all these
options in mind in the process.
Love and Stitches,
Sherri and Sam

Thursday, July 14, 2016
It's in the Papers
I’m working on two quilts that are made up of tiny
blocks. The first, Dear Jane, has been a
two-year journey, and the second, The Farmer’s Wife, is a fairly recent
undertaking.
Wonderful quilts.
Tiny, tiny blocks.
The Farmer’s Wife blocks are 6 ½-inches unfinished and
Dear Jane’s blocks are 4 ½-inches unfinished.
I’ve learned a great deal from both, but the primary lesson that I’ve
come away with is this: Paper piecing is a great tool to have in your quilting
tool box. The smaller the block, the better it is to paper piece it – or at
least so in my opinion. Same thing if
there are a lot of pieces in the block – it’s just easier to paper piece
it. Some quilt patterns have paper
piecing instructions, some are partially paper pieced and the remainder of the
pattern is traditionally pieced. Some
quilts, such as Dear Jane and the Farmer’s Wife, give you a choice.
Paper piecing (also called foundation piecing) is
defined as a technique that involves
sewing pieces of fabric to a paper foundation following a numerical
sequence. Seam lines are traced on the
foundation. The pieces of fabric are
sewn onto the back side of this foundation (the unmarked side, which is
actually the right side of the block). This sewing technique on a foundation
allows one to work with very small and uneven pieces with great accuracy, as
all sewing takes place along straight lines. (Angie’s Bits and Pieces)
Because of the accuracy, this is my go-to technique for
sharp points (e.g., flying geese, New York Beauty blocks).

New York Beauty Block

Flying Geese Block
Paper piecing is also a great piecing method
to use if you have a block that has lots of bias edges, such as those with
several half-square triangles. And if
you have blocks like you do in the Dear Jane Quilt – small, complicated blocks
with lots and lots of tiny pieces and seams – paper piecing is a terrific way
to feed all those small pieces through your sewing machine and over the feed
dogs because there is that smooth layer of foundation that won’t get caught in
the feed dogs like the miniature pieces of material and seams will.
However, to be completely honest, I was never a huge fan
of this technique until I attempted a Judy Niemeyer pattern several years
ago. Judy’s patterns are gorgeous and
making one of her quilts was definitely on my Quilting Bucket List. But if this was to be done, I knew that
somewhere along the way, I would have to discover my paper-piecing Zen. And I did.
Somewhere between the 800 flying geese and the New York Beauty squares,
me and paper piecing made our peace. So
now if I have lots of pieces, lots of biased edges, or need really sharp points,
I pull out the paper piecing technique and have at.

Judy Niemeyer's Glacier Star
The first decision in this technique is what am I going to use as the foundation? In other words, what medium is actually
going to have the pattern printed on it for you to follow? I’ve tried lots of different things, but I
keep coming back to two. The first is
standard 8 ½ x 11-inch newsprint. It
easily tears away once you’ve completed your block, and it’s thin enough to see
through. Remember, it’s the side of the paper that
the pattern is not printed on that’s the right side of the block, but
the cutting and sewing lines are on the wrong side. You still have to see these lines to make
sure you position your fabric correctly, and that you have enough to cover the
pattern piece. This newsprint paper is
sold in lots of quilt shops under the names of foundation papers or paper
piecing paper. You can save yourself
some bucks by going to an office supply store or an office supply on-line site
and ordering a ream of newsprint paper.
It’s the same thing, but you’ll have more money left over to buy
fabric. The 500 sheets will last you a
long, long time and it’s ink-jet printer friendly.

8 1/2 x 11-inch Newsprint Paper
My very favorite paper piecing foundation is June
Tailor’ Perfect Piecing Quilt Block Foundation Sheets. I really like these for two reasons: First, they’re sheer. You can easily see onto the right side of the
block pattern from the wrong side. And
second, you don’t have to tear them out of the block before you quilt it. Traditionally, all papers need to be removed
before you quilt the top, because it’s hard to quilt through paper of any kind
and when you wash the quilt, the paper will pull away and wad up (think of what
a paper towel looks like when you leave it in your pocket and put it through
the wash). However, these foundation
papers feel like thin interfacing and don’t necessarily have to be removed
prior to quilting. I do remove the
pieces that are in the seams to reduce bulk (I’ll show you this later on in
this blog), but the quilter can easily quilt right through the Perfect Piecing
Foundation Sheets. They come in 8 ½ x
11-inch sheets and easily go through the ink jet printers. Side note here – the ink jet printer
capability is important. More and more
patterns are coming out with CDs that have the paper piecing part on them and
require you to print those out. To have
something that will feed through your printer saves the step of printing the
patterns out on regular paper and then tracing them onto the foundation
paper.

June Tailor's Perfect Piecing Quilt Block Foundation Sheet
Side note number two here – Personally, I do not like
regular, standard 8 ½ x 11-inch copy paper for paper piecing for a couple of
reasons. First, sewing through this
paper dulls your sewing machine needle quickly.
Secondly, I don’t care how small you make your stitches, this paper is
difficult to tear away. It pulls on the fabric and can warp your block.
The block I’m using for this blog is number 87 in The
Farmer’s Wife Quilt. It’s called
Buckwheat and it was a candidate for paper piecing the moment I laid eyes on
it. It has lots of pieces and most of
those pieces have points and bias edges.
This is what the pattern looked like when I printed it off on the
Perfect Piecing Foundation Sheet.

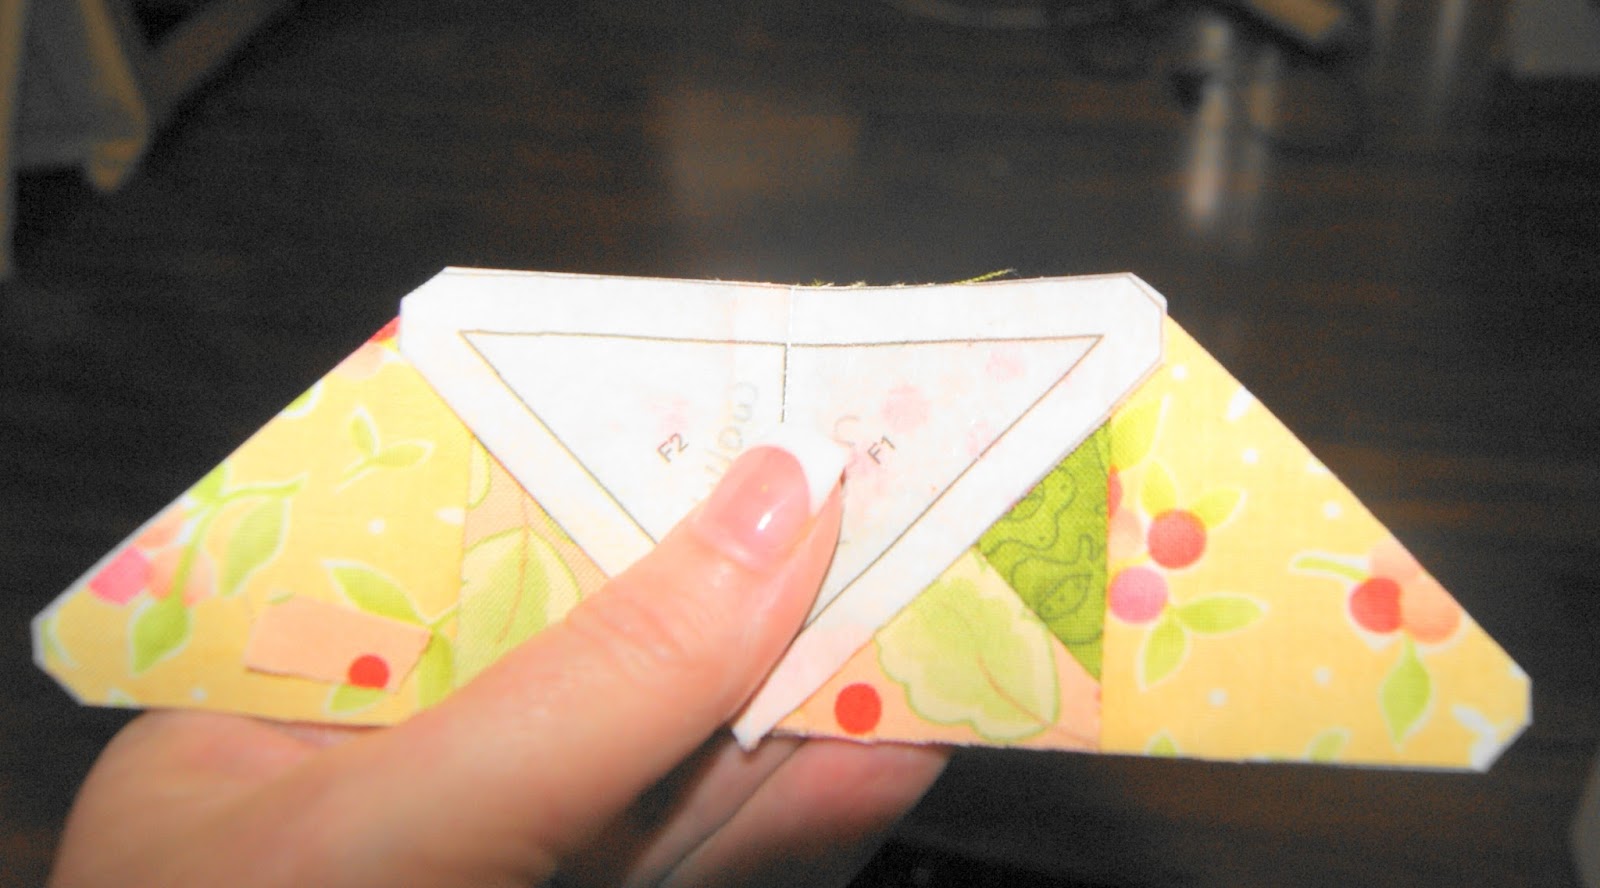
And this is what the back looked like.

Remember, the back side of the paper is the
right side of the block, so it’s important that you are able to see all the
lines clearly. The ¼-inch seam allowance
is already there, too, so you don’t have to add that when it’s trimmed
down. If several colors of fabric are
involved, I have always found it handy to write the color on each of the
pattern pieces so I don’t make a mistake in color placement.

Also notice that the pieces are already
numbered. Most patterns that are paper
pieced do this for you. However, as a
quilter gets more experience with this technique, they may opt to change the
numerical sequence to fit their style, or can take a block that is not paper
pieced and devise their own foundation pieced pattern.

The next thing I do is measure the pieces in the block
and cut out pieces of fabric that are approximately ½-inch larger than the
square or rectangle patch. If it’s an
odd shaped patch, or one that is not symmetrical, remember to mirror image the
patch, since it will be flipped around on the other side of the paper. Not all quilters do this – some just cut a
piece of fabric they know will cover the patch and keep moving. I don’t.
I like to be a little more precise with the material I cut. Paper piecing takes a little more fabric than
traditional piecing, so I do try to be as judicious as I can, since I’m trading
fabric for precision. After I’ve made a
list of the patches I need, I rotary cut them out and put them next to my
sewing machine.


While we’re at the sewing machine, let’s talk feet for
paper piecing. With traditional piecing,
most quilters use some type of ¼-inch foot.

My Janome 7700 Quarter Inch Foot with the Phalange
In paper piecing, you’re dealing with some issues that your regular
piecing may not involve. It usually
involves tinier pieces, more seams, and an added layer (the foundation
sheet). So you may find it easier to us
a walking foot (also called a dual feed foot).
This is the one for my Janome 7700.

See the little two-pronged piece behind the foot? That fits into slots on the bottom of my foot
and it literally walks the fabric over the feed dogs, making seams,
fabric, and the foundation piece move as
a complete unit, so there isn’t any slippage.
This is what makes points sharp and edges even.

Janome 7700 Walking Foot with the Dual Feed Engaged
You will also want to shorten the stitch length on your
machine. Most machines come from the
factory with a standard stitch length pre-programmed in the machine. My Janome’s is set at 2.20.

I lower it to 1.8 when I’m paper
piecing. This shorter length perforates
the newsprint or the June Tailor Foundation Sheets more than the standard
stitch length and allows either one to be removed easily without tugging on the
fabric – which can warp seams.

Now, with the right foot on the machine and the stitch
length adjusted, we can start. So let’s
talk glue. That’s right…glue. The first piece of fabric will be glued to
the paper or foundation sheet, not sewn.
So it’s important to have glue that isn’t permanent and will release
smoothly, not stain, and will wash out completely. The perfect candidate is the pre-school glue
sticks you can pick up at almost any dollar store. It fits all those criteria!

Here’s where you’re going to have to follow me closely
(I really need to make a video…).
Remember the wrong side of the
paper/foundation sheet is the right side of the block. Trim a section of the pattern from the
foundation sheet, leaving about an 1/8-inch margin of paper around the cutting
lines.

On the wrong side
of the paper, on the first patch, apply a dab of glue
Apply the first fabric patch and finger press for a
second or two for the glue and fabric to adhere.

Take it to your cutting area and flip it over so that
the paper or foundation sheet is facing you.

Find a post card, index card or one of those pesky
cardboard inserts that fall out of magazines and position it on the first
cutting line of the foundation sheet.

Fold back the foundation paper so that there is a crease
along the cardboard.

You will need to trim the patch, leaving a quarter-inch
seam allowance. I use the add-a quarter
ruler for this because it has a grove on it and fits snugly against the
cardboard. Trim along the ruler, to
leave a quarter-inch seam allowance.


Now, with the fabric facing you, line up the next patch
of material.

Flip the patch over so that
the foundation sheet is facing you, and sew along the seam that is printed on
the paper.


Position your needle to sew several stitches before it
begins sewing on the paper, sew straight down the printed line and then stitch
a few stitches off the paper.

Take it to ironing board and press the front and back of
the section. It’s important to note that
you have to do this to each patch. Line
up, sew, press, and then trim the unit when it’s complete.


When you trim, line up a ruler along the printed cutting
edge of the section and use your rotary cutter to trim the excess fabric and
paper off. Once complete, the section is
really nicely cut and perfect.


Work on the next set of patches the same way. I know it’s a lot of sewing, then pressing,
and then trimming, but I believe it’s really worth it. And if you’re using a Fitbit to track your
steps, this is a great way to get in a few extra!


Once you’ve completed the next section, you will want to
begin to put the sections together to form your patch. Again, the paper piecing sewing lines and the
walking foot on your sewing machine make this a really easy process. You simply match up the edges and sew along
the printed line.

At this point, I’ve always found it helpful to go ahead
and tear out the papers that are in the seams.
This allows for better accuracy when putting all the sections together
to form the block.

Then take it to the
ironing board and press the seam open. This is to reduce bulk. Most paper pieced blocks have lots of seams
and pressing as many of these open reduces the bulk, which makes it easier to
quilt.

And there’s your first section, all nicely done.

Repeat the process until all the sections are complete.


Sew the sections together and you’re done! However, if used paper of any sort in this
process instead of the foundation sheets, the paper will have to be removed.

Here are two more blocks that I opted to paper piece
this week for my Farmer’s Wife. The
first bock was just a little complicated.

The second block had more bias sides that I wanted to
think about! It was just so much easier
to paper piece this block and have the extra stability of the foundation paper
to keep the bias from stretching.

If you’ve never tried paper piecing, I would like to
encourage you to give it a try on a simple block. Carol Doaks has several easy
(and free!) blocks on her website that you could experiment with. If paper piecing isn’t your favorite
technique, let me gently encourage you to at least get better at it. You never know when it will come in handy,
and it’s a great tool to have in your quilting tool box.
Until next week!
Love and Stitches,
Sherri and Sam

Subscribe to:
Posts (Atom)