Saturday, December 19, 2015

So On The Way Home I Bought a Lotto Ticket.....


Let me start this week’s blog off by stating two things.

First, Thursday, December 17, was my Guild’s Christmas party.

And second, I never win anything.

I don’t.  I can buy a dozen lottery scratch-off tickets and won’t win a dime.  I can buy dozens of raffle tickets and get nada in return.  This has been my life since I was old enough to play BINGO in kindergarten.

Until Thursday night at the Christmas party. Besides being just the normal Christmas-party-type-event with the food, desserts, and fun, we were drawing tickets for the guild’s 2015 raffle quilt and the 2015 charity raffle prize.

I loved the raffle quilt.  I really did.  What wasn’t to love about this?
 

I had purchased two envelopes worth of tickets and crossed my fingers and toes and bra, but my name wasn’t drawn.  I wasn’t shocked, given my history, but was placated with the thought that I did have the instructions and could make my own.  After all, I had helped construct the 2015 raffle quilt and now knew the ins and outs of the pattern and a few very strategic short cuts.

However the prize I really, really wanted to win was the crafting accessory bag that the Charity Quilt program was raffling off.
 

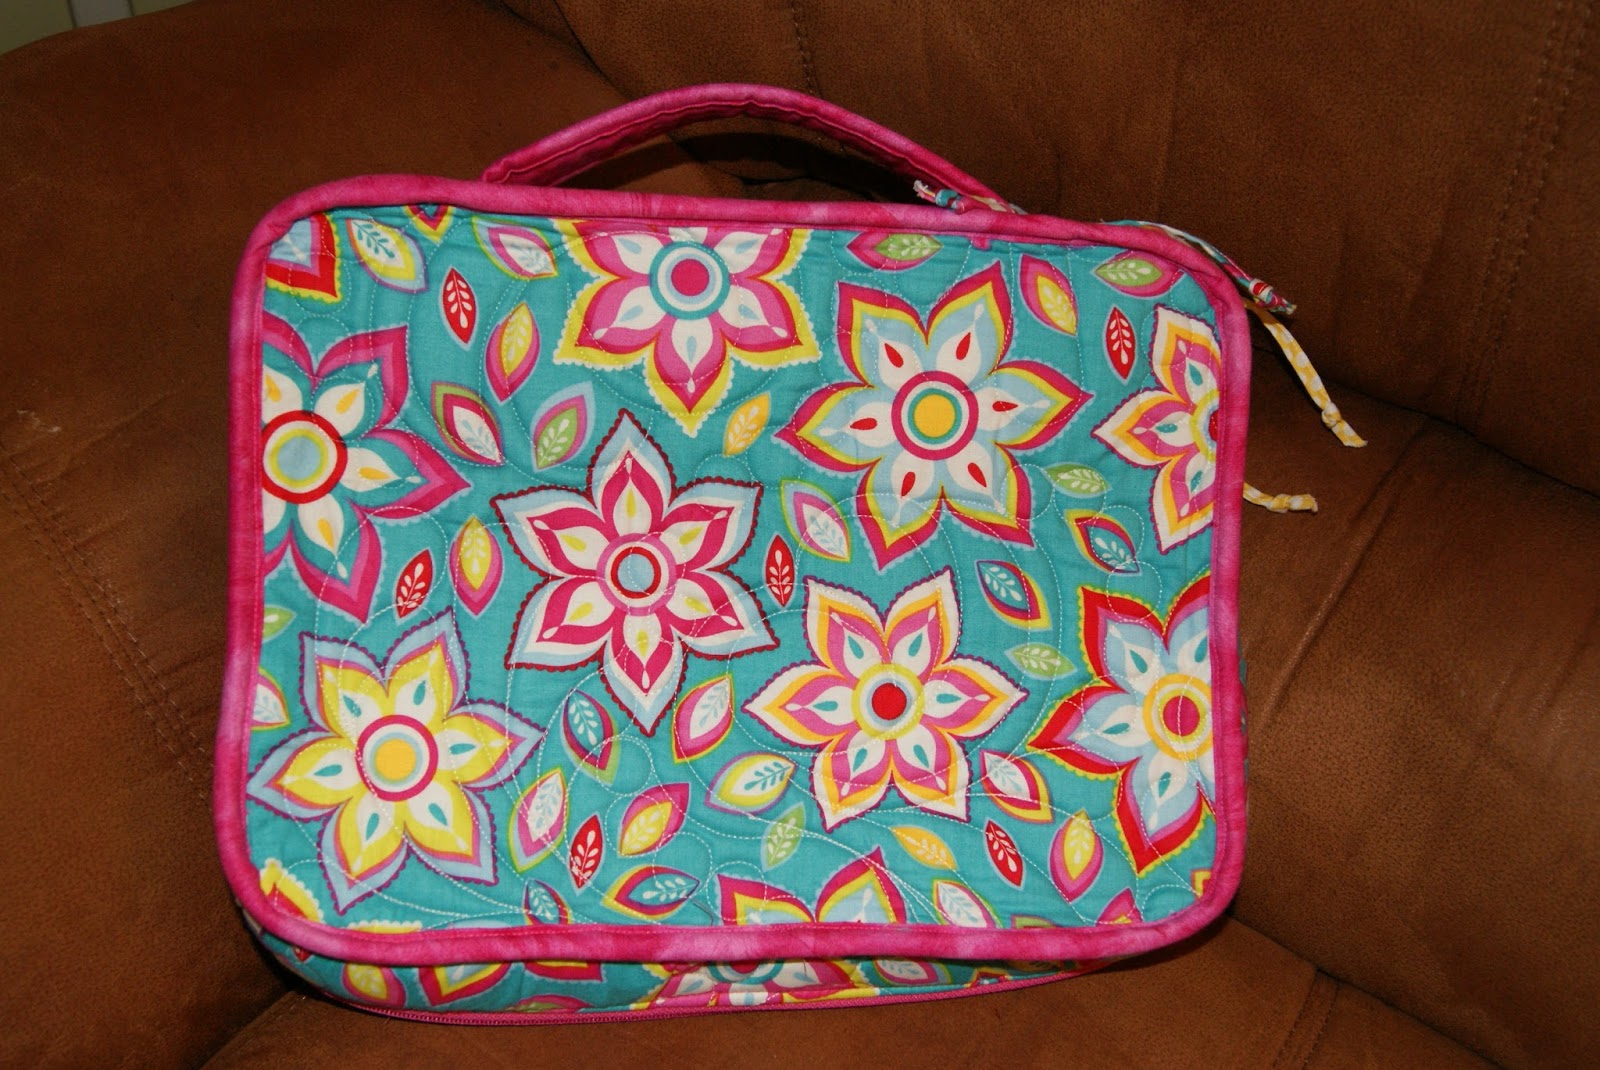
My good friend, Linda, had made one of these a couple of years ago and I had lusted after hers ever since.  I even strongly suggested that the guild make one for me as the outgoing gift at the end of my presidency.

Instead they gifted me with a gorgeous purple and white signature quilt that not only has every guild members’ name on it and my years as guild president, but also acknowledges that I was the founding president.  I cried when I received it and cry nearly every time I look at it.  It’s perfect. 

A few months later I purchased the Craftsy class for the bag and the zippers and vinyl to go with it.  I already had the fabric and had pretty much decided that as soon as cold weather set in so I couldn’t be beckoned outside, I would put in the hours on the bag. 

So when my name was drawn for the bag, I didn’t believe it.  They had to show me the ticket.

Hot damn!  Oh boy!

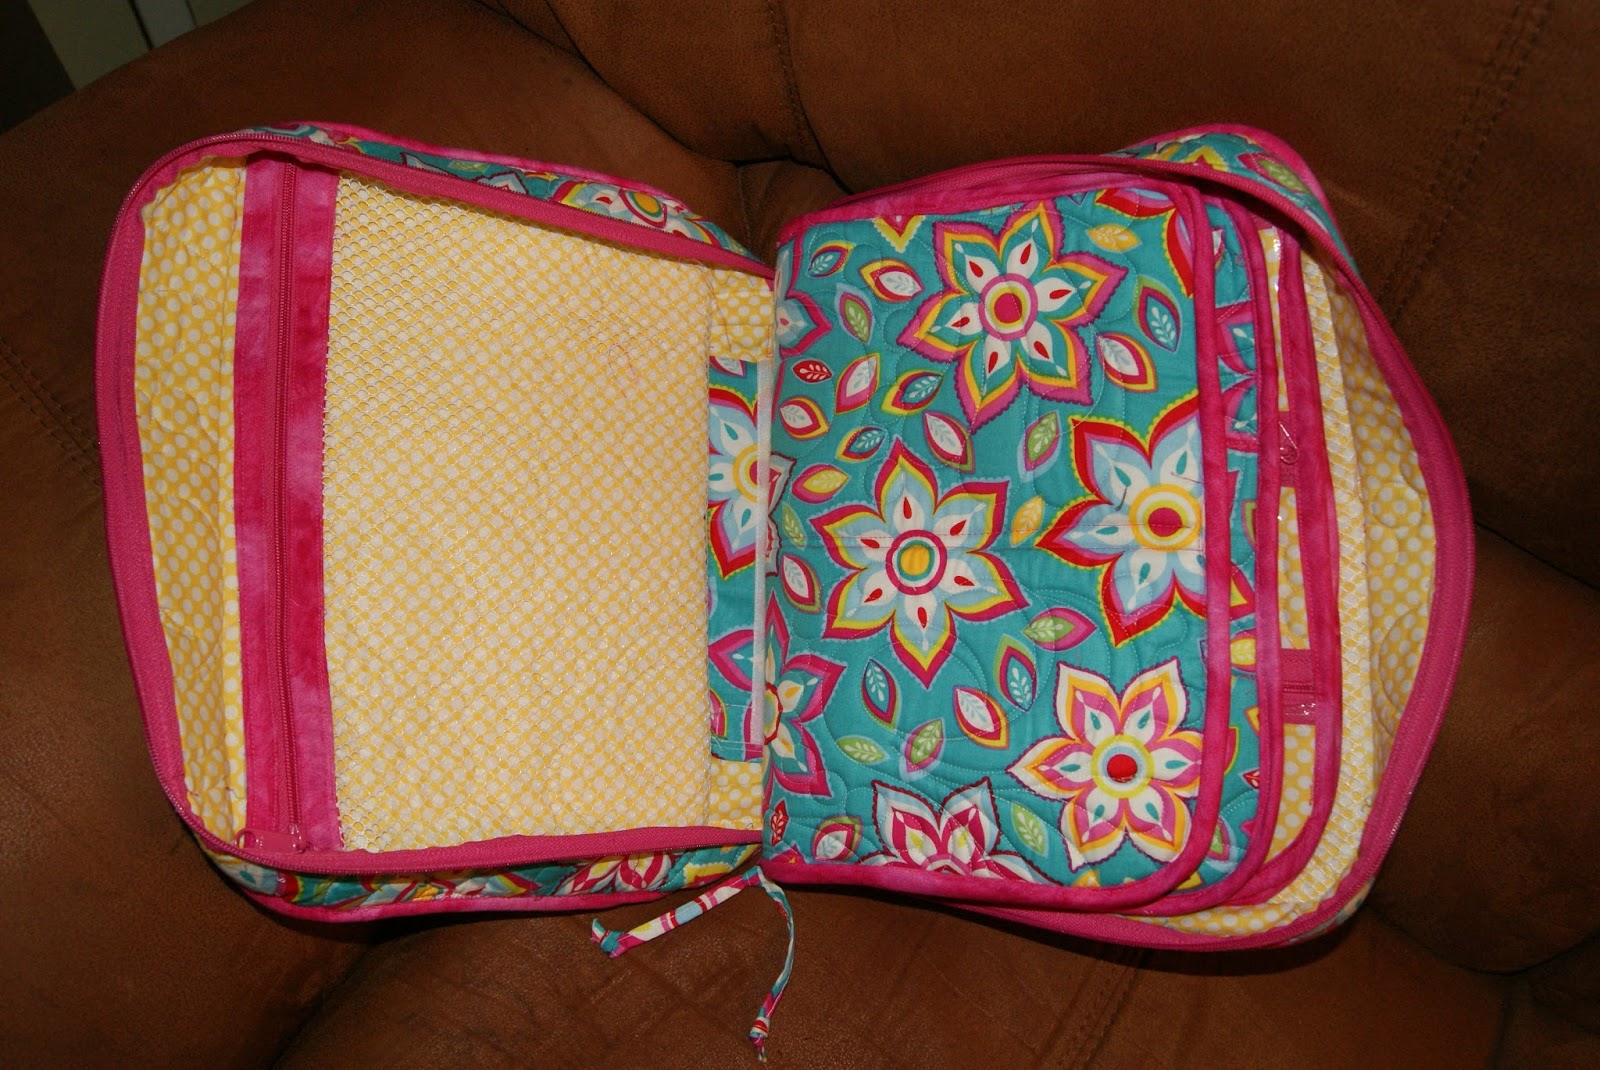
This. Is. The. Most. Wonderful. Bag. Ever.

Just look at all the compartments! 


But my good luck didn’t stop there.  We were instructed to bring four fat quarters with us to the party.  The first-vice president then led us in a great game of Dirty Santa.  If you’ve ever played this game, one of two things will happen.  Either everyone will be very nice and accept whatever is in their package without dissent; or there will be that one present everyone wants and it’s nearly a free-for-all until it’s claimed for the last time.

Take a gander at these fat quarters….
 

Nearly everyone wanted them…they were possessed by so many people I thought we were going to have to call an exorcist before someone would be able to take them home.

But guess who they ended up with at the end of the evening?

That would be me.

I had never had that much luck in one night EVER.

So when my good friend Nancy laughingly suggested that with the run of luck I was having, it may be a good idea to buy a lotto ticket on the way home, I kind of shrugged off her idea.  After all, how long of a good run of luck could I have? 

Then I began doing the math.  I’m 54 years-old.  I’ve never had this much good fortune in one sitting in…well, forever.  Mathematically the odds were in my favor.  And it would only take a few minutes.

This was my reasoning as I eased my SUV into a brightly lit convenience store that sold scratch offs.  I made my way inside and purchased a single scratch-off ticket…

And won ten bucks.

It has been a very Merry Christmas so far….

Love and Stitches…


Sherri

 PS...There will be no blog next week, as it's Christmas at my house.  I wish those who celebrate this holiday, Merry Christmas.  For those that are celebrating Hanukah, I wish you Hanukkah Sameach.  And for those celebrating Kwanzaa, Habari gani  If you don't celebrate any of these, have a great few days off and get some rest!


Thursday, December 10, 2015

Marking Your Territory


Most of the time my quilting blog has lots of pictures of quilts.  I find that quilts and quilters are my biggest source of inspiration.  They spur me on to finish my projects and try new ideas and patterns.

However, often I write about the basics of quilting.  No matter how complex and beautiful a quilt is, it really is only as good as the attention paid to the basics.  If quarter-inch seams and color selection are largely ignored, then the project, no matter how wonderful it seems to be, is never as good as it could have been.

So…today is one of those back-to-the-basic blogs.  I’m talking about how you mark your territory.

In other words, how and what do you use to mark the fabric in your quilt blocks?  I’m not talking about what you use to mark your top in preparation for quilting.  I’m highlighting (get it…highlighting…it’s a marking joke…) what you use to mark blocks for half-square triangles, or that quarter-inch mark for set in seams, or the background for your applique piece. 

A glance at the notions wall of your local quilt shop or fabric store, or at notions page in a quilt catalog will almost overwhelm a person.  There are so many choices…how do you know which to use?  All of them are generally broken down into markers, pens, pencils, and chalk.  There are a couple outside of this range, but not many.  I haven’t used all of the marking tools, but between nearly 30 years of garment sewing and quilting, I have used a number of them. 

Wash Away Pens
 
The wash-away pens are one of the marking tools produced by several sewing notions companies.  These generally come in blue and will fade away when misted with water from a spray bottle or iron.  They resemble fine-tipped markers and are wonderful to use.  However, just like a bad haircut can come back to haunt you, the marks can re-appear over time.  It’s very important that if you decide to use these markers, make sure to wash your quilt top in cold water after it’s completed.  And take care not to heat-set them.  The quality of the wash-away markers varies with manufacturer, so a quick Google search may be a great idea to do before purchasing.
Air Soluble Pens

The first cousin to the wash-away pens is the air-soluble pen.  These usually come in purple so you can tell them apart from their blue relatives.  The marks left by these pens disappear over a period of time.  That time frame can be 24-hours, 48-hours, or even less, depending on the brand.  Be sure to read the back of the packaging to know exactly what’s your deadline.  Like the wash-away pens, be sure to wash your quilt top in cold water and don’t heat set.  Normally, since I never know if I can get back to a project in 24-hours or less, I don’t use the air soluble pen unless I’m heading directly to the sewing machine or cutting mat.

Pink, Blue, and White Fabric Pencils
 
If you purchase a pre-packaged bundle of beginning quilting or sewing supplies, invariably it will come with a blue, white, or pink marking pencil.  These also work very well; again just make sure you wash them completely out of your fabric.  One word of caution, don’t sharpen them to a really sharp point.  This may put a hole in your fabric.  A rounded-tip works just as well.
The Dreaded Yellow Marking Pencil


However, beware of the dreaded yellow marking pencil.  Some of you may remember that I caved into peer pressure decided to try wool and flannel applique this year.  The backgrounds for these were very dark, so I grabbed the yellow-leaded pencil in my sewing basket that had probably been there since high school and used it.  To my complete and utter horror, it didn’t wash out.  It faded a little, but it did not go away.  Some clever embroidery hid it well, but that yellow is for all means and purposes, a permanent part of those projects. 

Since I have found myself working with dark backgrounds, the next few marking pencils also have the option of either white lead or white lead refills.

There are several types of mechanical marking pencils on the market and I honestly can’t say which one I prefer.  I like all of them, but my two favorites are Fons' and Porter’s and Sewline’s.  Both products offer white and gray lead and erasers with the pencils.  Sewline even offers green lead and pink lead and more eraser options. 
Fons' and Porter's Mechanical Pencil and Refills
 

Sewline's Mechanical Pencil Set that I would love to find in my Christmas stocking and their eraser refills
 

To my knowledge, Roxanne has not introduced mechanical pencils, but does offer their own line of pencils which, like their sewing needles, is wonderful.  They come in silver and white and are ph balanced – which means they are guaranteed to wash out and not leave any remaining marks at all either now or in the future.  I have found the lead to be softer in these pencils and would recommend using a hand-held pencil sharpener (Roxanne has their own brand, but any kind will work) instead of an electric or rotary pencil sharpener.
Roxanne's White and Silver Pencils with Sharpener

Chalk has always been an option to use as a marking tool.  And as a former teacher, I can say I pilfered many chalk stubs away from my classroom before white boards became the rage.  The tiny stubs were far too short to use on a blackboard, but were the perfect size to file down with an Emory board to a point and use on my quilts.  It was free and it washed out – what more could I ask for?

Now there are chalk wheels and chalk pencils that come in different colors and are perfect for light or dark backgrounds.  Clover even makes a liquid chalk marker that is fine-tipped and works great with wool applique.  Again, make sure you wash it out completely – especially blue chalk.  For some reason, that color is the most difficult to rinse away.
Clover's Liquid Chalk Pen
 

The last few two marking tools are not really made for fabric – and you really need to keep that in mind.  Prisma makes colored pencils that I have used in a pinch when nothing else has worked.  These pencils are generally not found in quilt or fabric stores but can be found in art supply stores and hobby stores.  The pencils will wash out.  Please do not confuse the Prisma pencils with the Prisma pens.  The Prisma pens can be found in quilts stores, as they are fine-tipped and used to mark templates and to sign quilt labels.  Once heat set, these will not wash out. 
Prisma Pencils
 

Frixion Pens are the new kids on the block.  These are found in office supply stores and I have seen them in local quilt shops.  And they have stirred up quite a debate – to the point that the manufacturer had to finally state that they were not made to mark on fabric. 

Frixion Pens come in a wide variety of colors and the ink disappears with heat – from an iron or an eraser.  They were manufactured in such a way that the ink disappears from paper by way of the heat from the friction of an eraser.
Frixion Pen Set

They were never meant to be used on fabric and the ink disappears with the heat of an iron.

Do I use them in quilting?

Yes.  For certain tasks they are ideal.  I mark half-square triangles (most of the mark will be cut away anyway), quarter inch seams, and centers.  These are tiny areas that even if the ink does come back, it won’t be noticeable – especially since I mark centers and quarter-inch seam intersections with tiny dots. 

Would I mark the background of an applique block with them?

Absolutely not.  Too many marks that may come back and haunt you.  And if the fabric is exposed to cold, the marks will return.  So I would not use them to mark applique backgrounds, applique pieces, or quilt tops.

But to have a marking tool I could pull out of my purse and use to write my grocery list or mark a half-square triangle at quilt bee?  Frixion wins.

However, I have to admit, my very favorite marking tool of all times is this little guy….
 

A #2 pencil.  Especially the mechanical ones.  Easily found (even if you’re traveling), easily washed out, and easy on the wallet.  You can’t beat it.


Please note I am not employed by any of the above mentioned manufacturers nor do I receive any type of payment or product for my endorsements.  The products I mention in my blog I have used myself and either like them or dislike them due to my own experience.  Your experience may be different -- and if it is, I'd love to hear from you.

Sunday, December 6, 2015

Time in a Bottle...Time after Time...Let's Do the Time Warp Again....


There are twenty-four hours in a day and seven days in a week.

That’s 1,440 minutes….and 86,400 seconds.

So…how many of those can you spend quilting?

It varies from person to person.  Most of my quilting friends are retired.  I envy the amount of time they can spend piecing and quilting.  But realistically most of us do work about an 8-hour day somewhere else and then have to come home to laundry and dishes and housework.  Once upon a time, I had to throw the mix of school in for both my kids and myself.  That cut even more into the time I had to work on my quilts.  I can be quite honest and say at that point in my life I did not  have more than a couple of quilts going at one time.

While everyone may have the same amount of time in a week, how that time can be structured to make it available to quilt can vary.  I can offer some suggestions…some of which I’ve used myself and some that my friends have proffered.

The first thing that I’ve learned to do is keep all my quilting supplies for a project together in a project box.  Office Depo sells these really neat clear, plastic boxes with lids.  They vary in size, some deeper than others, but they are wonderful to keep projects in. Quilt shops also sell these, but they are less expensive at an office supply store. I put fabric, pattern, thread, stabilizer…everything that I’m using with that project in one box and label the box.  That way when I do have a few minutes to sit at my machine, everything is all together and ready to rock and roll without having to play hide and seek with all my quilting supplies.

The second idea that I always have utilized is to keep my hand sewing projects out separately and in sewing basket together.  I purchased a large sewing basket from one of the big box fabric stores.  It has a tray in the top that I can keep all my hand applique supplies in and the bottom is large enough to keep two or three hand applique blocks tucked away.  If I had a day where I knew I would be running kids from Scouts to dance to tee ball practice, I could put the basket in the car and work on a block or two while waiting on the kiddos to get out of whatever meeting they were in. 

As they out grew Mom’s Taxi Service, and I was able to join additional sewing groups, I found that this still worked for me.  I rarely bother to take a sewing machine to a bee or sewing night.  As a matter of fact, I really don’t like to break down any of my machines to take out of the house unless I’m using it for most of the day wherever I’m at or it’s a class.  Presently I have three quilt projects I’m working on that involves handwork.  I can simply grab this sewing basket on the way out the door and have my choice of projects to work on at whatever bee I’m at.  This is also handy when I go out of town on vacation.  I can simply put the basket in the back of the car with my luggage and have it to work on at nights away.

Something else that works for me personally is getting up early to piece and quilt on the machine.  I’m definitely a morning person, and found pretty quickly rising as little as a half an hour early was really productive for me – especially after I had kids.  That time was uninterrupted and quiet.  It is amazing how much work I can get done in a quiet half an hour.  While Meg and Matt have long since moved away from home, I still like to get up a little early to work on an especially complicated pattern.  A fresh mind and a hot pot of coffee can work wonders!

Another motivating factor for me is a class.  To be sure, like most of the quilting-obsessed, I have a list of quilts I want to make before I’m called away to that Great Guild Meeting in the Sky.  But if I can find a class that offers instruction in that quilt…it does tend to move that pattern off my wish list and onto the long arm.  To be honest, at this point, I may not need the instruction from the teacher to make the quilt, but that teacher usually gives homework and I’m still way to much of a school nerd not to do my homework.  And if I do all my  homework, then the quilt will be completed (or mostly completed) by the time the class is through.  Plus it offers a great time of fellowship with other quilters. 

Some other suggestions include:

Clean and organize your quilting area after each quilt – that way you know where your supplies are.

Clean your machine and change your needle regularly.

When you get down to your last sewing machine needle, go ahead and purchase the next pack.  You know you’re going to eventually have to replace that last needle and buying the new pack now will save you a trip to the store later. Or having to wait until the store opens, since needles invariably break at 11 p.m.

Try to purchase all your supplies before starting a quilting project.  I can kind of agree with that…to a degree.  I often put off buying the backing, batting, and sometimes even the outer border fabric because I can’t find something I like when I’m purchasing everything else.  I do purchase as much as I can, but sometimes waiting just a little while can afford finding the perfect backing or border fabric you were looking for. 

Always have an extra rotary blade….see the suggestion about sewing machine needles.

The fact is that what works for me, may not work for you.  Getting up a half an hour early may not be something you want to ever contemplate, but staying up a half an hour after everyone in your house has gone to bed may work just fine and dandy.  You may not like hand sewing at all, so you have to be more creative on the  time you have at your machine.  It may mean being very judicious about what quilt projects you choose.

We make time for what is important to us.  Quilting is no different.

Love and Stitches,


Sherri


Saturday, November 28, 2015

What was I thinking? Or Otherwise Also Known as a Quilt Only Its Maker Could Love....


Every once in a while, I have to pause and wonder, “What in the world was I thinking?”

I  had one of those moments last week…as I was struggling with my Round Robin for the guild.  I’ve always participated in the Round Robin and have written several blogs about it and why I think every semi-serious quilter should participate in one at least once.  It stretches your creativity and your skills….blah, blah, blah, blahhhibity, blah, blah, blah.

It was for those reasons that when Linda decided to give up leading our guild’s Round Robin, I jumped right in there and said I would do it.

That was the first  “What in the world was I thinking?” moment in this little experience.

Not that this leadership position was especially demanding – not after being president for three years.  And not that I didn’t have a few new ideas.  I did.  I knew there were enough people that wanted to do the Round Robin, but were just a tad intimidated by working on someone else’s quilt.  So I came up with the idea (admittedly borrowed) for everyone to make a center square between 12- and 18-inches out of gray and white fabric.  The gray and white fabric could be used in any round of the Round Robin, but in addition to the gray and white fabric, we would pull two crayons out of a bag each month.  The accent fabric had to be any shade, color, or hue of the crayons.  And everyone would work on their own Robin.

The crayon idea had to be the second “What in the world was I thinking?” moment. 

Seriously?

I just figured that I’d go into the drug store below  my office and grab a pack of 8 crayons off the shelf, toss them in a bag, and I’d sucker one of the guild visitors to draw the crayons (so no one could blame me for rigging the color choice).

Let me categorically state here that my youngest child is 26.  Do you realize how long it’s been since I’ve had to buy crayons?  I naively assumed, since it was September and all the back-to-school items were still out, that an 8-pack of basic color crayons were easy to be had.

So one day during lunch, I ran into CVS, grabbed the first pack of eight crayons I saw and purchased them.  Two weeks later I opened them to dump them in a bag…and saw the horror of my reality.

For sure, there was the red crayon…and the blue crayon….but no orange, or black, or white.  I had a green and a brown…and a teal?  Seriously?  Teal?

Oy-vey.  I had pictured the ease of primary and secondary colors with the grays and whites.  It was too late to get another pack, since I was already almost late for guild meeting at that point.  So I had to go with what I had…which was not what I had thought I had.

And at this point let me add in the third “What was I thinking?” moment.  Along with the border width specifics I gave everyone, I also gave required blocks.  Half-square triangles.  Square-in-a-squares or flying geese.  Rectangles and circles. 

The first round wasn’t too hard.  We pulled red and blue crayons and had to use squares or half-square triangles.  The second round was a little harder.  This time we pulled brown and green crayons (I had several threats of mutiny over this) and either flying geese or square-in-a-square. 

I was pretty good with everything until this last round.  We pulled that teal crayon and a purple one.

Again…seriously?

Top that color choice with the fact that this round was rectangles and circles, and I hit a quilter’s block as big as Paducah in April.  I stewed over this for days. 

The stewing was definitely not me.  I’ve always been that guild member who brought her Robin home, immediately laid it out on her cutting table, and sketched out two or three ideas.  By the end of the week, I had something thrown into EQ7 and had printed out my pattern.

But not this time.  Between the really odd color choice and the rectangles and circles…I had hit a quilty roadblock.  I. Had. No. Ideas.

None.

So…I measured the width and length, divided it up, cut out rectangles and sewed on circles. It’s basic and to the point, and admittedly I could have done yo-yos or something more creative, but I was bumfuzzled and not ashamed to admit it.

I had just reached the point I wanted it done.

We have one more round to go on this little adventure.  But I am afraid I’m creating a quilt that only I can truly love.  It’s not attractive.  I doubt I will ever quilt it.   But you can bet I’m keeping this little sucker around to remind myself that if I ever come up with another bright idea like I did this time –  to pause and seriously ask myself “What are you thinking?!”


Thursday, November 19, 2015

Saturday, November 14, 2015

Praying for France


So I had planned to discuss marking tools on this week’s blog.  I had the outline and the pictures listed that I wanted to take.

Then Friday night happened, and suddenly that topic was no longer important or interesting.

I remember 9/11 vividly.  I was teaching middle school when my pager started going off like crazy – my husband, my mother, parents.  I was wondering what in the world was happening.  I couldn’t use my cell phone because it was against the rules to have it on in class without a really good reason.

Another teacher came to my classroom door and told me the first tower was hit. In the span of a few short minutes, the world as I knew it and my students knew it had turned upside down.  Life would never be the same again.

Yesterday afternoon while I was working at Dragonfly, my cell phone began to alert me to news messages about Paris, but it wasn’t until I got home about 6 p.m. that I fully understood what was going on – that France now had their version of the World Trade Center and an open field in Pennsylvania. 

This blog is not for political or religious points of view, per say, but it does serve as a vehicle to offer instruction as well as optimism and hope.  I’m afraid I’m running a little low on the optimism part this week, but I am full of hope.

Hope that those injured will recover.

Hope that those who need to leave France to come home will be able to do so.  Soon.

Hope that somehow one of the world leaders will be able to deal with these terrorists accordingly.

Hope in a Savior who has things totally under control, when the world seems completely out of control.

Meanwhile, I know a lot of us that quilt have time to think and pray as we do so.  There is rarely a day I don’t pour out my heart as I stitch.  Now as I do so, I will add the citizens of France to that list. 

I ask that you do the same.


Love and Stitches,

Sherri

Monday, November 9, 2015

It's Beginning to Feel a Little Like Christmas....


So…this blog is either late (because I usually publish between Thursdays and Sundays) or early.  I’m going to go with late, because I never made my deadline last week.  I have a very good reason….

I was playing Santa’s Helper.

As a rule, I don’t give quilts for Christmas.  I’m never quite sure how much they are appreciated as Christmas gifts unless someone specifically asks for one.  But this year I have two munchkins that are just at the right age for dolls and doll beds and doll quilts.

And I am blessed to have a couple of friends who agreed to play their parts as Santa’s Elves, too.

Shelle, one of my prime partners in crime, is married to a guy who makes beautiful things out of wood.  He agreed to make two doll beds for me.  Bless his heart, they are just perfect and he put vines and leaves and quilt blocks on them.  I love these for two reasons (besides the fact they’re just beautiful).  They’re not alike, so the granddarlings can’t fight over whose is whose, and they’re sturdy.  They will hold up to active play for years and years.
 

Karen, another good friend of mine who makes custom dolls – the cuddly type that can be played with and slept with – is making two dolls for the girls.  I will be sure to post pictures of those when she gets those to me in December.

But since I’ve had the doll beds in hand for a couple of weeks, I needed to make mattresses and sheets…
 

And doll quilts and pillows….
 

The quilts are quite utilitarian, but I figure they’re going to be the recipient of a lot of hard play and many washings.  As Evangeline and Elli get older and want to keep the beds out of sentimental reasons, I will make them elaborate applique quilts to use on the beds.

Since I’m now at the age I hate the pressure of deadlines, I opted to forge ahead and get these done.  I pieced the tops at the quilt retreat and finished everything else at home.

If nothing else, it’s beginning to feel a little like Christmas!


Love and Stitches,

Sherri


Sunday, November 1, 2015

So You're On A Deserted Island....


So this is the scenario…you’re stranded on a deserted island that somehow has electricity and running water because coffee is a must.  What are the ten quilting tools you must have to survive; given the fact that you’re fabric stash has somehow made it to this deserted island with you?
That question was bandied about a few months ago on a website that I frequent.  And it caused me to think hard about what I use most in my little quilting world.  So, without further ado, here’s my list.  And per usual, I couldn’t settle for ten, so here’s eleven.

1.     A Good stiletto.  I have a metal one and a wooden one and I like the wooden one best.  It has more uses.  It has a little pressing aid on one end and the stiletto part is one the other. It can be used for applique as well as for holding seams steady as you feed them through the sewing machine.
 

2.    Toothpicks.  I cannot applique without them, whether I’m doing needle turn or freezer paper, or Mylar applique, I have to have them.  And while we’re talking about toothpicks, the ones from Cracker Barrel are my favorite.  You can buy them at their restaurant stores, as well as a handy-dandy case to put them in.
 

3.    Titanium Sewing Machine Needles.  These are fairly new in the sewing world and they are more expensive but they are worth every extra penny.  They last longer and sew better. 
 

4.    Roxanne Hand Sewing Needles.  I’ve tried them all – John James, Singer, etc., but I like Roxanne’s the best.  The eye is big enough it can be threaded fairly easily and they glide….glide… through fabric.  Plus the case they come in is adorned with cute, little seashells. 
 

5.    Good Sewing Thread.  This is a must, for both hand sewing and machine sewing.  In either case, it doesn’t break, it makes a wonderful looking stitch, and it’s  better for your machine.  My favorite thread suppliers are Aurofil and Superior, but always use long staple cotton thread.  It doesn’t lint up your machine.  As far as hand applique thread, there are cotton threads and silk threads.  My favorite is cotton thread because it doesn’t slip out of the eye of the needle as easy as silk thread, but I do use both, depending on the look I want with my applique.


6.    A Good  Sewing Machine.  Notice I didn’t say expensive, just good and dependable.  Nothing is more frustrating than sitting down to sew and having to spend half your time dealing with machine issues – skipped stitches, obstinate bobbin cases, bad tension.  I strongly suggest that you purchase your machine from a local dealer because if you do buy it from a big box store or from a dealer on line, guess what?  If you have issues with the machine, you’re going to have to ship it somewhere to have it fixed. A local dealer will have a technician that can service and repair your machine.  That means you’ll have it back in your hands in a week, verses a month or more.  And while yes, I do have a top of the line machine that I sunk good money in, and it does hundreds of stitches, you don’t have to start that way.  All you need is a good machine that has a straight stitch and a zig zag stitch (for machine applique). 
 

Once you have a good machine, be sure to change the needle after eight hours of sewing (you can go longer with the titanium needles) and clean it regularly.


7.     Sharp Scissors and Rotary  Cutters and Rulers.  Nothing is worse than a dull pair of scissors or a rotary cutter.  Buy good quality ones.  Use them only for cutting fabric.  Buy cheap scissors for cutting paper.  Change the blades in your rotary cutter when they begin to skip or when they’re nicked.  I also like to have a couple of different sizes of each.  Small scissor are great for hand sewing and taking to class. Larger ones work better for cutting chunks of fabric.  The same goes with rotary cutters.  Ninety-five percent of the time I use a 45 mm. rotary cutter, but I have found a smaller one works much better cutting around templates.
 

Ditto with the rulers.  By good quality rulers (and mats).  I have a large rulers and a large mat that stays on my cutting table at home and smaller rulers and mats that go with me to class.  They all take a beating, but hold up well.


8.      Good Quality Basting Glue.  I honestly don’t hand baste much any longer.  Once I was introduced to basting glue, it was an immediate love affair.  It’s faster and basting glue has come such a long way.  My favorite is Quilter’s Choice.  Once applied to fabric and pressed, the material is not going to move.  The biggest plus about this product is that it dries soft. 
 

9.    Soft Fuse.  I was introduced to this product two years ago.  Up to that point, I used another fusible web, but had to do a great deal of “window paning” on my machine applique projects in order to keep them pliable.  Even after it’s pressed onto the applique piece and the applique piece is pressed onto the background, the product lives up to its name – it’s soft. 
 

10.   My Groups.  I love my quilting buddies and couldn’t live without them.  I don’t have any sisters, so these women have filled that void.  We have stitched together through good times and bad; gains and losses; projects we’ve loved and projects that have not been so loved.  They’ve been a great source of inspiration and constructive criticism.  I belong to three bees and two guilds and in some cases these women overlap.  These women have been a wonderful support system and I couldn’t live without them.  So these women would have to be on that deserted island with me.

11. The Internet.  Hey…the island has running water and electricity, so why not at least an internet hot spot? 

Years ago, in the mid-seventies when quilting was enjoying a resurgence due to our country’s bicentennial, loose groups began to form via the United States Postal Service.  Newsletters were mimeographed and sent out. Often times Round Robin types of patterns were established, with one quilter starting a pattern and sending it to the next quilter, who would add their comments and pass it along to the next.  By the eighties, one of these became a slick magazine called Quilters Newsletter, and was soon joined by several other quilting magazines. 

As the nineties began and technology began to grow by leaps and bounds, these publications automatically began web pages.  Businesses that sold quilting supplies developed on-line stores.  Quilters could purchase items on line and have them shipped out to them the next day, verses filling out an order form and mailing it in and having to wait weeks.  Now you have on-line quilting groups, blogs, patterns that are downloadable, and Pinterest.  Sewing machines have groups and certain quilts (like Dear Jane) have groups, and even certain techniques (such as hexies) have groups.  

And that’s not even counting Facebook, which has connected quilters across the world.   

If there’s a problem or question with a machine or pattern or fabric or anything else quilting related, all it takes is a few keystrokes, a click of a mouse, and it can be posted.  Within hours (maybe even minutes), you can have your answer.   

How did we ever live without it? 

In my opinion the internet is the greatest tool quilters have. 

So, this deserted island is now up for grabs.  What would you take?


Love and Stitches,


Sherri