Saturday, May 30, 2015

Your Quilting Footprint

I caught a cold this week.

A terrible, awful, very bad cold from my granddarlings.

I'm on the mend today (Saturday), but I have not felt well since Tuesday.  Finally after gallons of chicken soup and tons of cold meds later, I am better.  However, since my days this week consisted of  just getting what work I needed to get done accomplished and face-planting into the bed, I haven't had time to take pictures and edit them.  I really am disappointed because I finished two tops that I would really like to show you.

Hopefully next week....fingers crossed.

Instead I'd like to talk about your quilting footprint. 

As quilters, we all know how important it is to document your quilt.  Labels are extremely important.  And if you're not labeling your quilts stop reading right now and get busy labeling. If you've read my blogs about my antique quilts, one of the issues that I lament over is that none of them have a label. 

None.

I purchased each of the quilts at consignment or thrift shops.  Before I handed over the cash, I always asked about the history of the quilt. One of the ladies at one of the consignment shop even called the current owner for me and put me on the phone with him.  Unfortunately, the only thing he remembered was that the quilt was made by a great-aunt from Northern Virginia and he couldn't even remember her full name.  All that quilting history -- lost.  It's just so sad.  Quilters put so much energy and heart into their quilts and for years never considered what they did significant enough to document it in any way.

So please, on that label, put your full name, your location, who the quilt is meant for, the date, and pattern used.  It will help so much in the future.  If you don't believe me, Google your state's quilt documentation.  Back in the 1970's and 1980's (and even beyond that in some states), groups of quilters got together with Quilt Symposiums and the National Associations and called for quilters and families to bring in their quilts.  They did this in order to assemble a quilt history for each state.  If you're into history, this is a fascinating study not only in quilts, but in textiles. 

But boy, was it challenging.  The internet was still in its infancy then, if it existed at all in some circumstances. 

And that's what I want to discuss today.  The internet.  Like it, love it, or hate it, it's here to stay.  All of us -- no matter how computer illiterate some folks are -- leave an electronic foot print.  Whether it's medical records, email, or Facebook, electronically we will live forever in cyberspace.

Some people think this is not the best thing -- that some folks are too attached to their cell phones and Ipads and now their Apple Watch.  Most days I honestly wish I could fling my cell phone off the highest cliff.  But then again, I don't miss those days when I would come home from work and would spend a half an hour wading through phone messages on my answering machine before I started dinner.  I figure that the internet is kind of like cable TV.  I'm just old enough to remember when cable TV first came out and everyone it seemed condemned it. From pastors in the pulpit to the guy that delivered your newspaper, it seemed everyone thought it would be the end of family time and decency.  I mean, you were going to be able to get those trashy movies that should be only shown at the theater beamed right into your den on your TV set!

Look how far we've come.  We're able to get classic old movies, cooking shows, do-it-yourself TV, and even quilting shows.  So cable wasn't all evil and neither is the internet. 

As far as quilting goes, I believe that the internet is a quilter's greatest tool.   Between YouTube and quilting forums, any question can be answered and  pattern or fabric can be found.  But it's also a great documentation tool.  And that's what I would love for every quilter with internet access to begin to think about. 

There's only so much information a quilter can put on a label, or your label gets to big.  If you're putting your quilts on your Facebook page or a quilting forum, you can add so much more  information.  You can tell where the fabrics are purchased, how much you paid for them, how long each step took, why you chose the pattern and the colors, what the quilt means to you and why you decided to give it to a certain person.

So much -- so very, very much -- quilting documentation that can live on forever in cyberspace.  Imagine what it would mean to your grandchildren and they're children if they can find your quilt on line in years to come and learn what that quilt meant to you.

What I wouldn't give if I could know these things about my great-grandmother's quilts. 

We use the internet for everything else, from recipes to real estate purchases.  There's no reason not to use it in quilt documentation. It's quick.  It's easy.  And it will last.

So have a Nike moment and  just do it.

Friday, May 22, 2015

The Trouble with Robins and Math

My guild hosts a Round Robin.

And it's awesome.  It's a fun thing and it's something that I firmly believe that every semi-serious quilter needs to do at least once during her quilting tenure.  It's challenging on several levels.  First, the design may not be one of your favorites.  But it's the other quilter's idea, not yours and you've got to contribute in some positive way to that design.  Second, you may not like the colors.  But it's not your quilt, and your preference doesn't matter.  Somehow you have to come up with a complementing design and work with what you're given.  The last three Round Robins I worked on had nary a scrap of purple, but hey, I made it work.  Third, and most challenging to a lot of folks, is that there is no pattern for a Round Robin, whether that Robin is a Row-by-Row or a Border Round Robin.  You have to study the overall design of the quilt and come up with a design idea that works with the theme of the quilt and then make sure it fits.

If the quilter has an Electronic Quilt program and knows how to work with it, a lot of the third challenge is dealt with.  You can put in the perimeters, search the border library, find it, and print out the rotary cutting, templates, or foundation piecing directions in a point-and-click minute. However, not all quilters have the software, so you have to learn to do the math.  I also firmly believe that even if you have an EQ program, you need to learn to do the math.

And here's where a good many quilters freeze up.  Either they aren't comfortable with the math or they're not sure about exactly how to do the math.  Let's look at the Round Robin I received for our June Guild Meeting:
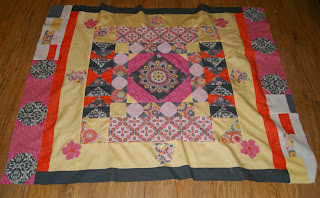
This is my friend, Shelli's, quilt.  She did the medallion in the center and since our guild's is a Border Round Robin, each person put on a border.  Linda, the  Chief-Robin in charge of the Round Robin program, has rules for each border added on.  Each border has to be a specified width and each border must have certain blocks.  By the time I got Shelli's quilt, I had the last border, which had to be 7 1/2-inches wide and had to incorporate triangles and rectangles.

One of the rules that I have for myself, is that I have to begin working on the Robin the same week I get it -- that way I don't wait until the last minute and half-heartedly throw something together.  The owner deserves my best and I like to plan.  Seven-and-a-half inches is a wide border, so the first thing I did was try to divide it into portions that would please the eye and not overwhelm the fabrics.  So I decided to sew on 2-inch floaters and then the main portion of the borders would be 5 1/2-inches.  Shelli had put a lot of fabric in her box, but then again, I was the last Robin member who got her box.  I was down to scraps.  So my floaters became opposing colors and I had to piece them. 

The first Robin member who got Shelli's quilt used snowballs and squares to surround the center medallion.  Since the snowball block uses triangles, I decided to echo that again in off-set corners and to add rectangles. 

Now the fun part sets in.  I had to do the maths.

Math doesn't bother me too much.  I taught chemistry and physics to high school students at one point in my life.  Formulas and decimals don't fluster me too much. 

Converting them into fractions -- which is what quilters deal with -- does.  So let me introduce you to my little friend...


It's a Quilters FabriCalc.  It can figure wonderful things like how many half-square triangles you need for a quilt, how long your drop needs to be, how big your quilt needs to be for an odd-sized mattress.  It's about the neatest quilting tool I have.  But the thing I like the most....

See that little forward slash button?  That converts any number into a fraction.

Joy and rapture.

Now before you go Googling to see where you can purchase one of these little jewels, let me add something here.  If you have a Smart Phone, there is an app for this.  And it's far less expensive than what I paid for my FabriCalc in the days before Smart Phones.

Okay...so here we go with addition and division folks.  The quilt, when it came into my possession, measured 37 1/2" x  37 1/2" That. Was. Horrible.  See, 37 is a prime number -- a number divisible only by itself and the number one.  I hate primes in quilting because then you get funky numbers like 23 1/32 or 12 1/16.  Seriously?  My science background pushes me to be very precise and here's where I get into trouble -- you can't get real precise with 32nds and 16ths in quilting because they're not marked on the rulers or the cutting mats.  So you have to be comfortable rounding up.

I went ahead and made my 2-inch floaters, cutting them at 2 1/2 inches to allow for 1/4-inch seam allowances.  I added them and this brought the quilt to 41-inches square.  Again with the primes...oy-vey.

So I decided on making three 5 1/2-inch square snowball blocks, separating them by 5 1/2-inch blocks of fabric on the right and left sides.  I would then need to fill the rest of the 17-inch space with rectangles.  This is where I began to play with numbers as to what would look nice.  I finally decided that four 4 1/4 x 5-inch rectangles would work nicely.  This was a subjective decision.  I could have gone smaller or bigger, but I thought these measurements would like the best against a 5 1/2-inch square or snowball. 

Now, please remember this as you may be working with the maths on your quilt.  When you're figuring out what to do, do not figure the seam allowances until last. So the 4 1/4 x 5-inch rectangle is the finished measurements.  I had to add a half-inch to each measurement to allow for seam allowances before I cut them out.  So I had to cut out four 4 3/4 x 5 1/2-inch rectangles (4 1/4 + 1/2 = 4 3/4 and 5 + 1/2 = 5 1/2). 

Before I sewed the rectangles on to the snowball units, I sewed varying widths of rectangles onto them from the scraps in Shelli's box.  So the left and right sides ended up looking like this....


Now to work with the top and bottom borders.  Measuring the quilt one more time (and remember, you always measure across the middle  of your quilt to be the most accurate), I found out that it was now 51-inches across.

I swear I couldn't pay to escape prime numbers on this quilt.  Shelli better be glad I love her....

This time I did a six-unit fabric and snowball block, keeping with the 5 1/2-inch squares because they were going to join up in the opposing corner.  This unit finished at 26 3/8-inches, which left me an empty design space of 24 5/8-inches.  I needed to keep the rectangles in this area as close to the 4 1/4 x 5-inch rectangles as I could so that everything blended well together.  However the 4 1/4 x 5-inch rectangles would not work.  So instead of four rectangles, I decided to use six.  24 5/8 divided by 6 equals 4 1/8.  Add a half an inch for seam allowances and you come up with a 4 5/8 x 5 1/2-inch rectangle.  So I cut six of these, added the scrappy rectangles randomly and sewed them on the top and bottom.


Since the rectangles' measurements are a little different, this does mean that you have to learn to live with this:


The corners do not exactly meet in the opposing corner settings.  They're off slightly a little over 1/4-inch.  However, the background fabric (white) is the same in all the blocks, so unless you're looking right at it, it's not that noticeable.  Plus Shelly is fabulous on her long-arm and I'm sure she would be the first to tell you "That will quilt right out..."

So there is a moral or two to the blog this week.

1.  At some point, try a Round Robin.  Even if it's just a few of your quilting friends that do it informally, give it shot.  It will really help you grow as a quilter.

2.  Be considerate of your Round Robin members.  Don't wait until the last minute to work on their quilt.

3.  Be mindful of any Round Robin Rules.

4. Don't be afraid of the math.
As I always told my chemistry and physics students, numbers are your friends.  They don't lie and they don't bite. At least not hard.  Words have far more bite.

Love and Stitches my Robins,

Sherri

Friday, May 15, 2015

Getting There...

Just wanted to share a few pictures with you this week.  My new sewing room has been a loooonnngggggggggggg on-going transformation from a rec room to a quilt studio.  Well at least it used to be a rec room and then it transformed into a bedroom for my son.  When Matt moved out, Bill claimed it for his den.

When he offered it to me for a studio, he didn't have to ask twice.  It's the largest room in the house, as it is the full width of the house.  Actually getting my husband to vacate his den took a little longer than expected, but he has finally moved his golf and fishing and photography stuff out and we're now in the process of painting the ceiling and the walls.


I need to pick out lighting and a new floor.  I have some cabinets in mind, so if everyone can work with my deadlines, I hope to be in by the end of June.

I'll keep you posted.

Thursday, May 7, 2015

Let's Get Right to the Point

When I walk into a quilt shop or fabric store, it's so easy to get caught up with the "shiny."

You know what I'm talking about...the beautiful fabric, the pretty quilting thread, the neat embellishments, the clever patterns.

The shiny - the stuff that everyone sees first when they're making a quilt.  It's easy to get wrapped up in all of that and forget the not-so-shiny stuff.  Let me explain what I mean.  Think about Walt Disney's Cinderella.  Do you remember what Cinderella's dress looks like?

Yeah.  I do, too.  Never understood why glass slippers though.  They would be so uncomfortable to dance in.

Now do you remember what her ugly step-sisters wore to the ball?

I'll give you a minute....

Didn't think you did.  To be honest, I don't either.

They were very ordinary. We tend to ignore the ordinary, everyday stuff.  We just simply take it for granted.

Like hand sewing needles.  We grab one and get to the task, whether it's applique or sewing on binding.  Almost every quilter will at sometime or another, no matter how machine-oriented we are, have to undertake some hand sewing. 

But having the right needle can make all the difference in the world.  Ignoring some specialty needles (such as the ones used in doll making and beading), needles come in sizes 1 through 12.  The smaller the number the larger the needle. So the number 1 needle is way bigger than the size 12.  Most quilters use the ones that fall in the middle somewhere -- the betweens, the sharps, and the quilting needles.

And there are lots of brands of needles.  One thing I would encourage is to try the different brands and see which one you like best.  I personally like the Roxanne needles for both quilting and applique.  The eyes are slightly large, which makes threading them easy, but they glide through the fabric wonderfully.  I use the Roxanne's for both hand sewing and hand quilting.  Roxanne's are found primarily at quilt shops.  I've never seen any at a big box store, but that doesn't mean that there's not one out there that carries them.  If you can't find them at the local quilt shop, they are available on-line.  They come in a sweet, clear canister with a seashell glued to the top.  Most big box stores and quilt shops carry John James needles, and they are also very good needles.  Other needle brands are Richard Hemming, Foxglove Cottage, Mary Arden, Colonial, JP Coats, Boye, S. Thomas and Sons, Clover, Bohin, Dritz, and Piecemakers.

Don't go for the cheapest unless they work really well for you.  Handwork often isn't as visible as the choice of fabric and it's easy to decide to save a few cents by buying the cheapest brand since it's not really seen.  Do yourself a favor and don't.  Needles aren't that expensive to begin with and the right needle that slides in and out of the fabric without you struggling with it is well worth the extra pennies.

It's also very important to use the right needle for the right job.  I mean, you wouldn't try to grill a steak on your blender, right?  Nope.  You're gonna fire up the George Foreman and save the blender for your morning smoothie. 

Same thing with needles.  It's really not good to use a quilting needle for hand applique.  Quilting needles are smaller (usually the 9's or 10's),  The smaller the needle, the  easier it is to slide it in and out of the top, batting, and backing.  I've tried using smaller needles for quilting, but I only end up breaking the needle or bending it when I try to stack my stitches.  I like 7's for applique, because I like smaller needle.  I can handle it better and manage my stitches easier.  Try the 6's - 8's for hand applique. In a pinch, I've even used a 9, although that is typically a quilting needle.

Like nearly everything else, needles have a limited life.  If the needle usually glides through fabric easily and begins to snag or be difficult to guide through the material, look at the needle through a magnifying glass. The plating on the outside of it could be worn thin or it could have a burr.  Needles can be bent.  The acidity in the perspiration off your fingers can affect it.  The point of the needle can be dulled.  If any of this happens, throw it out and feel no guilt. 

So there are no pretty pictures in this blog posts, just lots of good information. 

I promise to make it up to you next week.

Love and Stitches...

Sherri